Glide 4.9源码解析-图片加载流程

本文Glide源码基于4.9,版本下载地址如下:Glide 4.9

前言

由于Glide源码真的很复杂,因此本文只分析和贴出与图片加载流程相关的功能以及代码。另外本文Glide源码基于4.9,与3.x的源码还是存在差异的,但是整体流程变化不大。

对于Glide这个强大的Android图片加载开源框架,相信大家并不陌生吧,反正笔者的话,正常项目中用的图片加载框架大多数都是它,因为用起来真的很方便快捷,用起来便捷,但真的说明它的源码就是那么简单吗?所以今天想揭开Glide的神秘面纱,从源码来分析一下Glide的图片加载流程。

在多数情况下,我们想要在界面加载并展示一张图片只需要一行代码就能实现了,如下所示:

1
Glide.with(this).load(url).into(imageView);

所以我们对Glide图片加载流程的源码分析可以分为三部曲:

  • with
  • load
  • into

接下来就让我们一起来弹奏这三部曲!

一、with

1. 作用

  1. 得到RequestManager对象
  2. 预先创建好对图片进行一系列操作(加载,编解码,转码)的对象,并添加到Glide的注册表registry中
  3. 将Glide加载图片的生命周期与Appliction/Activity/Fragment进行绑定

2. 流程

2.1 时序图

1571208748325

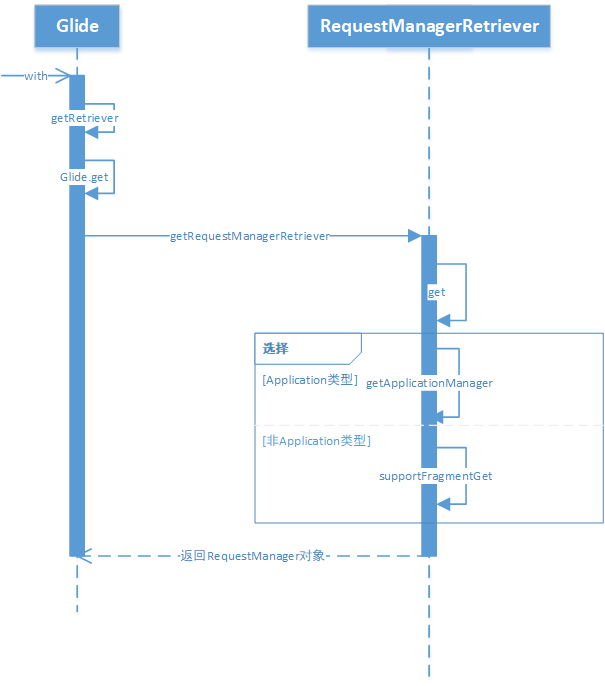
首先,从使用中我们知道,第一部曲中我们先调用的是Glide的with方法,所以先来看看这个方法

Glide#with

1
2
3
4
5
6
7
8
9
10
11
12
13
14
15
16
17
18
19
20
21
22
/**
* Application类型
*/
public static RequestManager with(@NonNull Context context) {
//getRetriever会返回RequestManagerRetriever的单例对象
//RequestManagerRetriever的get会返回RequestManager对象并绑定图片加载的生命周期
return getRetriever(context).get(context);
}

/**
* 非Application类型
*/
public static RequestManager with(@NonNull Activity activity) {
//跟Application类型一样会调用RequestManagerRetriever的get获取RequestManager对象
//不过需注意在这里传递的参数为Activity
return getRetriever(activity).get(activity);
}

public static RequestManager with(@NonNull FragmentActivity activity) {
return getRetriever(activity).get(activity);
}
...

可以发现,with方法是Glide类中的一组静态方法,在Glide中有很多的重载方法,可以传入Context,Activity,Fragment等,然后with里面的实现很简单,就一句代码,看返回类型就知道其功能是干嘛,就是返回一个RequestManager对象。那么具体是如何来得到这个对象呢,让我们来看看!

2.2 获取RequestManagerRetriever对象

在返回RequestManager对象对象前首先会返回RequestManagerRetriever对象,不管with的参数是什么,调用的都是getRetriever方法,而且getRetriever并没有重载方法,所以获取RequestManagerRetriever对象的步骤是一样的,让我们来追踪一下到底是如何获取到这个RequestManagerRetriever对象的。

1
2
3
4
5
6
7
8
9
10
11
12
13
14
15
16
17
18
19
20
21
22
23
24
25
26
27
28
29
30
31
32
33
34
35
36
37
 private static RequestManagerRetriever getRetriever(@Nullable Context context) {
...
//1.调用Glide.get获取到Glide的对象,Glide对象中封装了RequestManagerRetriever对象
//2.通过Glide的getRequestManagerRetriever()获取到RequestManagerRetriever对象
return Glide.get(context).getRequestManagerRetriever();
}

public static Glide get(@NonNull Context context) {
if (glide == null) {
synchronized (Glide.class) {
if (glide == null) {
//重点关注
checkAndInitializeGlide(context);
}
}
}
return glide;
}


private static void checkAndInitializeGlide(@NonNull Context context) {
if (isInitializing) {
//如果同时进行两次初始化会抛出该异常
throw new IllegalStateException("You cannot call Glide.get() in registerComponents(),"
+ " use the provided Glide instance instead");
}
isInitializing = true;
//进行初始化操作
initializeGlide(context);
isInitializing = false;
}
private static void initializeGlide(@NonNull Context context, @NonNull GlideBuilder builder) {
....
//构造Glide的实体对象,此时的builder为GlideBuilder
Glide glide = builder.build(applicationContext);
....
}

首先getRetriever方法看起来好像跟with里面的代码很类似,其实主要做了两件事:

  • 通过Glide.get获取到Glide的对象
  • 调用Glide的getRequestManagerRetriever()获取到RequestManagerRetriever对象

在Glide的get方法就是简单标准的单例实现。在initializeGlide中会通过GlideBuilder的build来构造Glide的实体对象,这个Glide的构造很重要,因此我们来看看GlideBuilder的build方法是如何来构建Glide对象的

1
2
3
4
5
6
7
8
9
10
11
12
13
14
15
16
17
18
19
20
21
22
23
24
25
26
27
28
29
30
31
32
33
34
35
36
37
38
39
40
41
42
43
44
45
46
47
48
49
50
51
52
53
54
55
56
57
58
59
60
61
62
63
64
65
66
67
68
69
70
71
72
73
74
75
76
77
78
79
80
81
82
83
84
  @NonNull
Glide build(@NonNull Context context) {
......
//构建管理线程池与缓存的执行引擎
if (engine == null) {
engine =
new Engine(
memoryCache,
diskCacheFactory,
diskCacheExecutor,
sourceExecutor,
GlideExecutor.newUnlimitedSourceExecutor(),
GlideExecutor.newAnimationExecutor(),
isActiveResourceRetentionAllowed);
}

//构建了一个RequestManagerRetriever对象
RequestManagerRetriever requestManagerRetriever =
new RequestManagerRetriever(requestManagerFactory);

//构建Glide对象,并将上面的众多线程池和RequestManagerRetriever对象封装进去
return new Glide(
context,
engine,
memoryCache,
bitmapPool,
arrayPool,
requestManagerRetriever,
connectivityMonitorFactory,
logLevel,
defaultRequestOptions.lock(),
defaultTransitionOptions,
defaultRequestListeners,
isLoggingRequestOriginsEnabled);
}
}

public class Glide implements ComponentCallbacks2 {
Glide(
@NonNull Context context,
@NonNull Engine engine,
@NonNull MemoryCache memoryCache,
@NonNull BitmapPool bitmapPool,
@NonNull ArrayPool arrayPool,
@NonNull RequestManagerRetriever requestManagerRetriever,
@NonNull ConnectivityMonitorFactory connectivityMonitorFactory,
int logLevel,
@NonNull RequestOptions defaultRequestOptions,
@NonNull Map<Class<?>, TransitionOptions<?, ?>> defaultTransitionOptions,
@NonNull List<RequestListener<Object>> defaultRequestListeners,
boolean isLoggingRequestOriginsEnabled) {
...
//将RequestManagerRetriever对象赋值到成员变量中
this.requestManagerRetriever = requestManagerRetriever;
....
//解码器
StreamBitmapDecoder streamBitmapDecoder = new StreamBitmapDecoder(downsampler, arrayPool);
//添加到注册表中
registry
.append(Registry.BUCKET_BITMAP, InputStream.class, Bitmap.class, streamBitmapDecoder)
....
/* Models */
//重点关注InputStreamRewinder
.register(new InputStreamRewinder.Factory(arrayPool))
....
//重点关注StringLoader.StreamFactory()
.append(String.class, InputStream.class, new StringLoader.StreamFactory())
....
//重点关注HttpUriLoader.Factory()
.append(Uri.class, InputStream.class, new HttpUriLoader.Factory())
....
//重点关注HttpGlideUrlLoader
.append(GlideUrl.class, InputStream.class, new HttpGlideUrlLoader.Factory())
....
/* Transcoders */
//重点关注BitmapDrawableTranscoder
.register(
Bitmap.class,
BitmapDrawable.class,
new BitmapDrawableTranscoder(resources))
.....

}
}

从上面可以看出Glide对象的创建干的事情贼多,也极其复杂,总的来说其职责如下:

  • 创建RequestManagerRetriever对象
  • 创建管理线程池与缓存的执行引擎Engine对象(下文需用到)
  • 构建registry,注册了众多编解码器(下文需用到)

其中在注册表registry中,上面的代码只列举了几个下面会用到的编解码器,实际上注册表的东西远不止这几个。我们重新确认下我们的目标获取RequestManagerRetriever对象,在上面的代码中已经new出了一个RequestManagerRetriever对象,并赋值到了Glide的成员变量,接下来就可以通过Glide的getRequestManagerRetriever方法获取到这个RequestManagerRetriever对象了。

2.3 获取RequestManager对象

让我们重新看看其中一个with方法

RequestManagerRetriever#with

1
2
3
public static RequestManager with(@NonNull Context context) {
return getRetriever(context).get(context);
}

当我们获取到了RequestManagerRetriever对象后,就需要通过RequestManagerRetriever的get方法获取RequestManager对象,在RequestManagerRetriever类中get跟Glide的with一样也有很多重载方法,重载方法对不同参数的处理是不同的,根据不同的处理可以分为两种类型的参数:

  • Application类型
  • 非Application类型(Activity/Fragment)

2.3.1 获取到Application类型的RequestManager对象

RequestManagerRetriever#get

1
2
3
4
5
6
7
8
9
10
11
12
13
14
15
16
17
 //Application类型
public RequestManager get(@NonNull Context context) {
if (context == null) {
throw new IllegalArgumentException("You cannot start a load on a null Context");
} else if (Util.isOnMainThread() && !(context instanceof Application)) {
//若在主线程且context不为Application类型
if (context instanceof FragmentActivity) {
return get((FragmentActivity) context);
} else if (context instanceof Activity) {
return get((Activity) context);
} else if (context instanceof ContextWrapper) {
return get(((ContextWrapper) context).getBaseContext());
}
}
//若不在主线程或者为Application类型的调用getApplicationManager获取一个RequestManager对象
return getApplicationManager(context);
}

可以发现,参数为context的get有两种处理:

  1. 如果在主线程且context不为Application类型的就直接调用非Application类型的get方法
  2. 如果不在主线程或者为Application类型的就调用getApplicationManager获取RequestManager对象

在这里我们分析的是Application类型的,所以直接看getApplicationManager方法

RequestManagerRetriever#getApplicationManager

1
2
3
4
5
6
7
8
9
10
11
12
13
14
15
16
17
18
19
20
21
22
23
24
25
26
27
28
29
30
31
32
33
34
35
36
37
  private RequestManager getApplicationManager(@NonNull Context context) {
if (applicationManager == null) {
synchronized (this) {
if (applicationManager == null) {
//get方法为获取Glide的单例对象,
//由于上面已经创建好Glide的单例对象了,所以在这里就直接取Glide的单例对象不需创建
Glide glide = Glide.get(context.getApplicationContext());
applicationManager =
factory.build(
glide,
new ApplicationLifecycle(),
new EmptyRequestManagerTreeNode(),
context.getApplicationContext());
}
}
}
return applicationManager;
}

public interface RequestManagerFactory {
@NonNull
RequestManager build(
@NonNull Glide glide,
@NonNull Lifecycle lifecycle,
@NonNull RequestManagerTreeNode requestManagerTreeNode,
@NonNull Context context);
}

private static final RequestManagerFactory DEFAULT_FACTORY = new RequestManagerFactory() {
@NonNull
@Override
public RequestManager build(@NonNull Glide glide, @NonNull Lifecycle lifecycle,
@NonNull RequestManagerTreeNode requestManagerTreeNode, @NonNull Context context) {
return new RequestManager(glide, lifecycle, requestManagerTreeNode, context);
}
};
}

在上面的方法中,也是标准的单例实现,通过上面的分析我们知道Glide已经创建好了,并且Glide的get也是单例实现,所以直接获取到Glide对象,并new了一个ApplicationLifecycle,然后传入Glide和ApplicationLifecycle对象等并创建了RequestManager对象从而实现与Application生命周期的绑定。

那么为什么Glide可以直接绑定Application的生命周期呢?

这是因为Application对象的生命周期就是App的生命周期,所以Glide加载图片的生命周期直接与与应用程序的生命周期绑定的就行,不需要做特殊处理。

2.3.2 获取到非Application类型的RequestManager对象

这里我们只以参数为Activity类型的为代表,因为其它非Application类型的处理与Activity基本是类似的。

RequestManagerRetriever#get

1
2
3
4
5
6
7
8
9
10
11
12
13
14
15
16
17
/**
* 非Application类型
*/
public RequestManager get(@NonNull FragmentActivity activity) {
if (Util.isOnBackgroundThread()) {
//如果在子线程则直接调用Aplication类型的get
return get(activity.getApplicationContext());
} else {
//判断Activity是否销毁
assertNotDestroyed(activity);
//获取FragmentManager对象
FragmentManager fm = activity.getSupportFragmentManager();
//通过调用supportFragmentGet返回RequestManager
return supportFragmentGet(
activity, fm, /*parentHint=*/ null, isActivityVisible(activity));
}
}

对于非Application类型的,首先要判断这个请求是在主线程中还是子线程中,如果是子线程中就调用Application类型的get方法,这也可以明白,因为在子线程中Glide的生命周期应该与Application的生命周期相一致。

如果是在主线程中,就调用supportFragmentGet方法来跟Activity的生命周期绑定。

RequestManagerRetriever#supportFragmentGet

1
2
3
4
5
6
7
8
9
10
11
12
13
14
15
16
17
18
19
20
21
 private RequestManager supportFragmentGet(
@NonNull Context context,
@NonNull FragmentManager fm,
@Nullable Fragment parentHint,
boolean isParentVisible) {
//获取SupportRequestManagerFragment
SupportRequestManagerFragment current =
getSupportRequestManagerFragment(fm, parentHint, isParentVisible);
//实现创建,添加Fragment
RequestManager requestManager = current.getRequestManager();
//如果首次加载则初始化requestManager
if (requestManager == null) {
Glide glide = Glide.get(context);
requestManager =
factory.build(
glide, current.getGlideLifecycle(), current.getRequestManagerTreeNode(), context);
//设置到SupportRequestManagerFragment中
current.setRequestManager(requestManager);
}
return requestManager;
}

supportFragmentGet是如何与Activity进行绑定的呢?其流程如下:

  1. 创建隐藏的Fragment
  2. 向当前的Activity添加一个隐藏的Fragment
  3. 创建RequestManager对象,然后将RequestManager与隐藏的Fragment的生命周期进行绑定

也许你会问为什么绑定了Activity中隐藏的Fragment生命周期就能与Activity进行绑定了呢?这是因为Fragment的生命周期与Activity是同步的,所以通过绑定的隐藏的Fragment就能监听Activity的生命周期,进而实现Glide加载图片的生命周期与Activity同步,并且通过这样的方法还能避免Glide持有Activity的实例而发生内存泄漏问题。

3. 小结

到这里with的工作就结束了,让我们来总结一下with的主要工作

  • 构建Glide对象
    • 创建管理线程池与缓存的执行引擎Engine对象
    • 构建registry,注册了众多编解码器
    • 构建RequestManagerRetriever对象
  • 构建RequestManager对象
    • 如果在子线程中加载图片或with中的参数为Application类型,则Glide图片加载的生命周期与Application生命周期绑定
    • 否则,Glide图片加载的生命周期与Activity或Fragment的生命周期绑定,绑定的方式:向当前的Activity/Fragment添加一个隐藏的Fragment,然后绑定这个隐藏的Fragment的生命周期。

二、load

1. 作用

创建一个目标为Drawable的图片加载请求,传入需要加载的资源(String,URL,URI等)

2. 流程

2.1 时序图

1571226445492

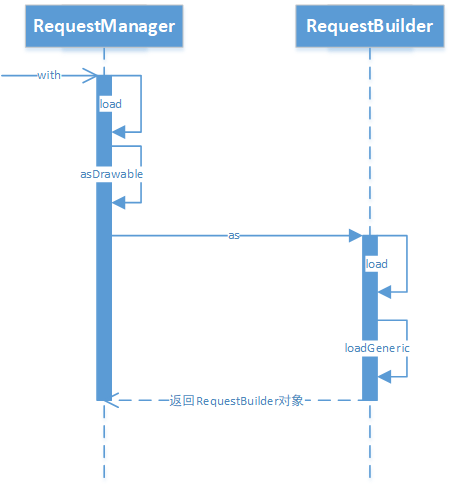
2.2 创建RequestBuilder对象

从上面对with的分析,我们知道with最终会返回一个RequestManager对象,故第二部曲的开始就是RequestManager的load方法。

RequestManager#load

1
2
3
4
5
6
7
8
9
10
11
12
13
14
  public RequestBuilder<Drawable> load(@Nullable String string) {
//1.asDrawable创建一个目标为Drawable的图片加载请求
//2.调用load将加载的资源传入
return asDrawable().load(string);
}

public RequestBuilder<Drawable> load(@Nullable Uri uri) {
return asDrawable().load(uri);
}

public RequestBuilder<Drawable> load(@Nullable URL url) {
return asDrawable().load(url);
}
.....

可以发现load在RequestManager也是有很多重载方法的,但是下面我们只分析最常见的加载图片的load参数,即load(String url)。

在RequestManager的load方法中,首先会先调用asDrawable,让我们来看看asDrawable

1
2
3
4
5
6
7
8
public RequestBuilder<Drawable> asDrawable() {
return as(Drawable.class);
}

public <ResourceType> RequestBuilder<ResourceType> as(
@NonNull Class<ResourceType> resourceClass) {
return new RequestBuilder<>(glide, this, resourceClass, context);
}

上面的代码很简单,就是创建了一个目标为Drawable的图片加载请求RequestBuilder。

2.3 传入图片URL地址

由于asDrawable返回的是RequestBuilder对象,因此下一步将会调用RequesBuilder的load方法

RequesBuilder#load

1
2
3
4
5
6
7
8
9
10
public RequestBuilder<TranscodeType> load(@Nullable String string) {
return loadGeneric(string);
}

private RequestBuilder<TranscodeType> loadGeneric(@Nullable Object model) {
//将数据赋值给RequestBuilder的静态成员变量
this.model = model;
isModelSet = true;
return this;
}

上面的代码很容易理解,load调用了loadGeneric方法,loadGeneric方法中将数据,此时将String类型的model赋值给了RequestBuilder的静态成员变量。

3. 小结

load估计是三部曲中最简单的一部曲子了,代码简单,也很容易理解。此部曲也是3.x与4.9的区别之一,在3.x的源码中load本来还应该完成一项任务,即预先创建好对图片进行一系列操作(加载,编解码,转码)的对象。而通过上述对with的分析,我们知道在4.9的源码中,这项工作已经交给with来处理了,所以load相比较其它两个来说,其工作是比较简单的。

三、into

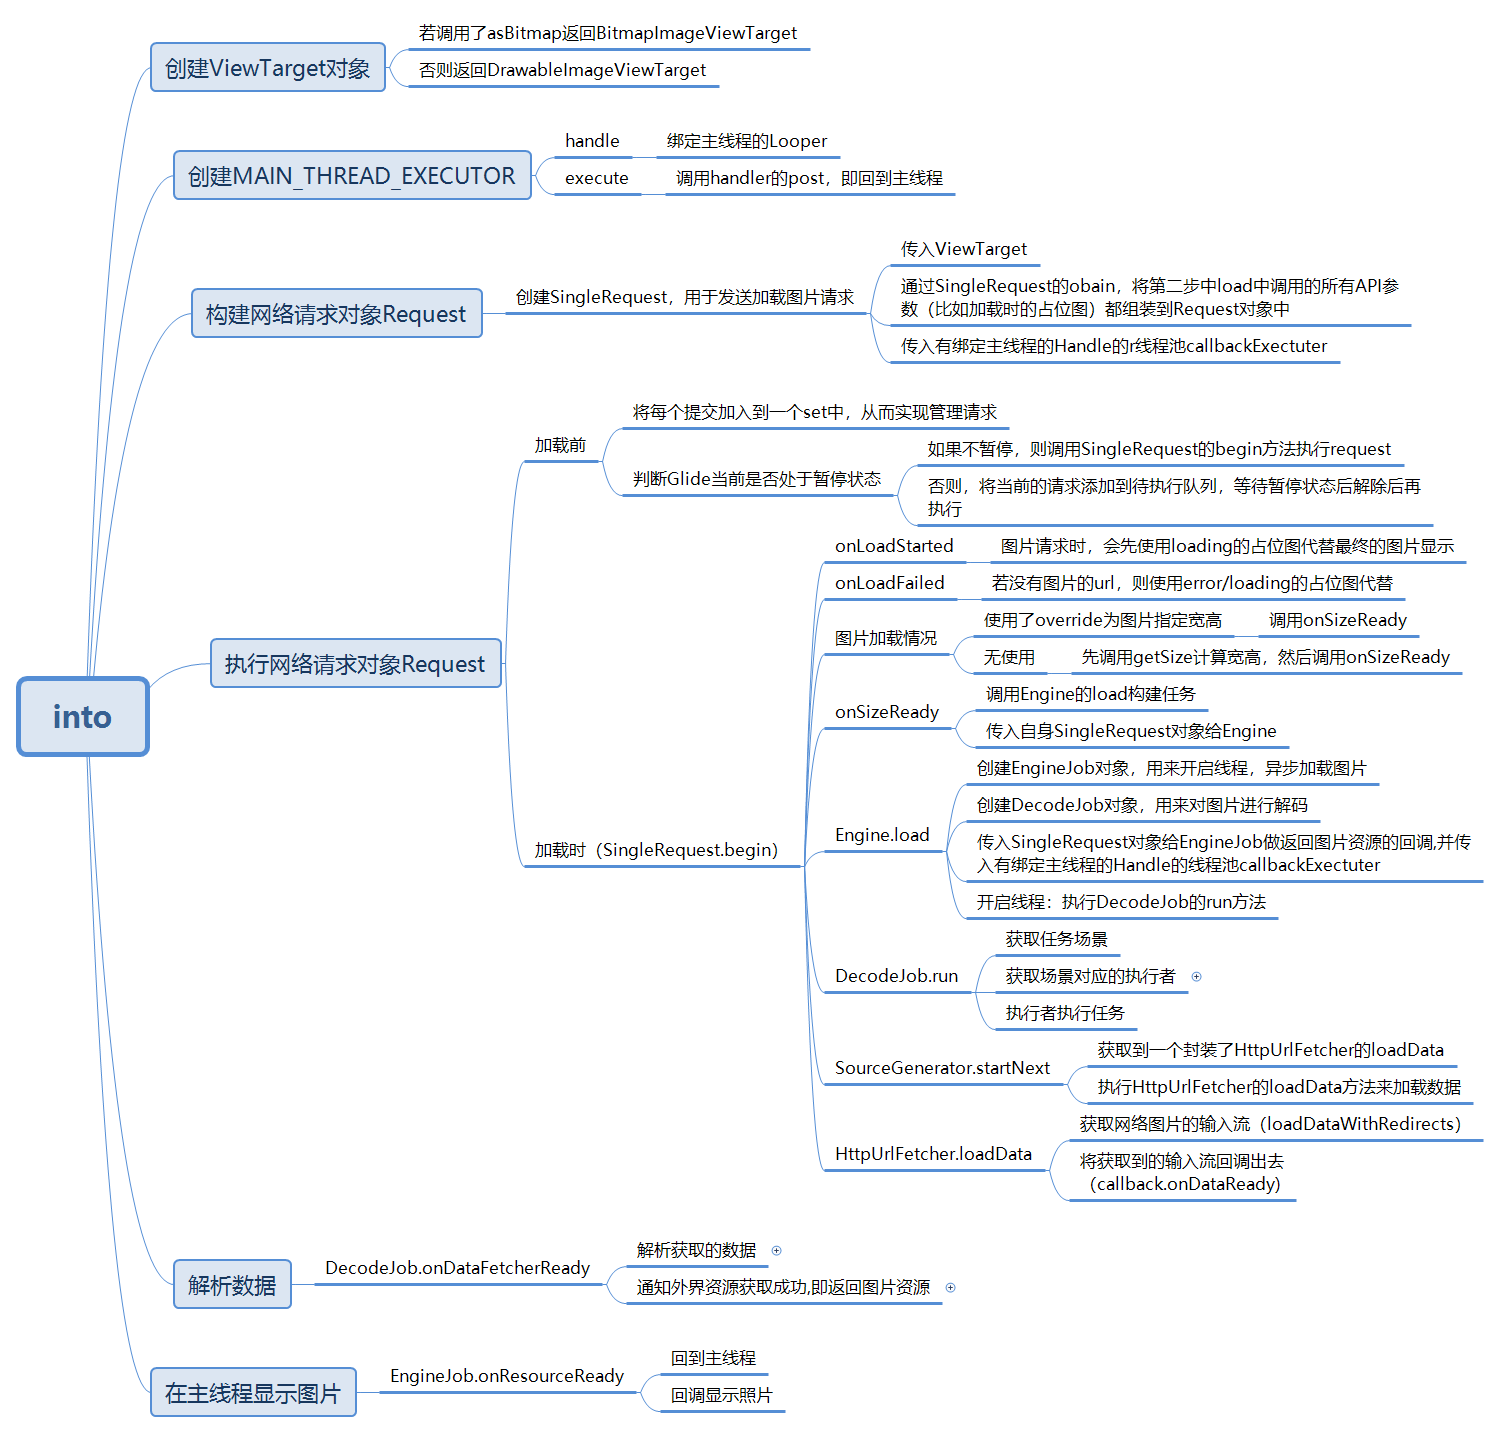
!!!高能预警,into的源码分析将会很长很长很长

1. 作用

在子线程中网络请求解析图片,并回到主线程中展示图片

2. 流程

下列的源码基于load参数为String的情况下

在上面对load的解析中我们知道,load执行完后返回的是RequestBuilder对象,所以into的入口就是RequestBuilder

RequestBuilder#into

1
2
3
4
5
6
7
8
9
10
11
12
public ViewTarget<ImageView, TranscodeType> into(@NonNull ImageView view) {

.....
//返回ViewTarget对象
return into(
//glideContext为GlideContext类型
glideContext.buildImageViewTarget(view, transcodeClass),
/*targetListener=*/ null,
requestOptions,
//含有绑定主线程Handler的线程池
Executors.mainThreadExecutor());
}

在上面的代码中,我们知道在调用into之前会先获取要传递的参数,这里我们重点关注第一个参数和第四个参数。

2.1 创建ViewTarget对象

首先我们先分析GlideContext的buildImageViewTarget方法.

GlideContext#buildImageViewTarget

1
2
3
4
public <X> ViewTarget<ImageView, X> buildImageViewTarget(
@NonNull ImageView imageView, @NonNull Class<X> transcodeClass) {
return imageViewTargetFactory.buildTarget(imageView, transcodeClass);
}

此时传入的transcodeClass其实就是我们在第二部曲中分析的asDrawable中传入的Drawable.class,然后继续调用了ImageViewTargetFactory的buildTarget方法。

ImageViewTargetFactory#buildTarget

1
2
3
4
5
6
7
8
9
10
11
12
13
public <Z> ViewTarget<ImageView, Z> buildTarget(@NonNull ImageView view,
@NonNull Class<Z> clazz) {
if (Bitmap.class.equals(clazz)) {
//若是调用了asBitmap方法
return (ViewTarget<ImageView, Z>) new BitmapImageViewTarget(view);
} else if (Drawable.class.isAssignableFrom(clazz)) {
//否则
return (ViewTarget<ImageView, Z>) new DrawableImageViewTarget(view);
} else {
throw new IllegalArgumentException(
"Unhandled class: " + clazz + ", try .as*(Class).transcode(ResourceTranscoder)");
}
}

因为我们并没有调用asBitmap方法,并且传入的是Drawable类型,所以返回的ViewTarget对象应该是DrawableImageViewTarget,这个对象在展示图片时将会用到。

!!!注:下文代码中出现的target,如果没有特殊说明都是DrawableImageViewTarget对象。

2.2 创建MAIN_THREAD_EXECUTOR

让我们回到前面的into方法。

1
2
3
4
5
6
7
8
9
10
11
12
13
 public ViewTarget<ImageView, TranscodeType> into(@NonNull ImageView view) {
....
//返回ViewTarget对象
return into(
//buildImageViewTarget创建ViewTarget对象
//transcodeClass若调用了asBitmap则为Bitmap,相应的返回BitmapImageViewTarget,
//否则transcodeClass为Drawable类型,返回DrawableImageViewTarget
glideContext.buildImageViewTarget(view, transcodeClass),
/*targetListener=*/ null,
requestOptions,
//含有绑定主线程Handler的线程池
Executors.mainThreadExecutor());
}

接着我们继续分析第四个参数

Executors#mainThreadExecutor

1
2
3
4
5
6
7
8
9
10
11
12
13
14
private static final Executor MAIN_THREAD_EXECUTOR =
new Executor() {
//绑定主线程的Looper
private final Handler handler = new Handler(Looper.getMainLooper());

@Override
public void execute(@NonNull Runnable command) {
handler.post(command);
}
};

public static Executor mainThreadExecutor() {
return MAIN_THREAD_EXECUTOR;
}

从上面可以发现在这个mainThreadExecutor中返回的是MAIN_THREAD_EXECUTOR,而MAIN_THREAD_EXECUTOR声明了一个绑定了主线程Looper的Handler,然后这个线程池的execute方法会执行handler的post方法,相当于在主线程中执行command的run方法。(这里先讲明白这个线程池,因为当分析到最后在主线程中显示图片时会重新分析到这个参数,另外这里涉及到了Handler机制的知识,不懂的可以看看前面写的博客Android之Handler机制

分析完了into的两个参数,我们接下来就看看这个重载into方法

RequestBuilder#into

1
2
3
4
5
6
7
8
9
10
11
12
13
14
15
16
17
18
19
20
21
22
23
24
25
26
27
28
29
30
31
32
33
 private <Y extends Target<TranscodeType>> Y into(
@NonNull Y target,
@Nullable RequestListener<TranscodeType> targetListener,
BaseRequestOptions<?> options,
Executor callbackExecutor) {
Preconditions.checkNotNull(target);
if (!isModelSet) {
throw new IllegalArgumentException("You must call #load() before calling #into()");
}
//构建Requset对象,发出加载图片请求
//注意第四个参数传进去的是含有绑定主线程的Handler的线程池
Request request = buildRequest(target, targetListener, options, callbackExecutor);
//在开始前先释放掉target对象已存在的请求
Request previous = target.getRequest();
if (request.isEquivalentTo(previous)
&& !isSkipMemoryCacheWithCompletePreviousRequest(options, previous)) {
request.recycle();

if (!Preconditions.checkNotNull(previous).isRunning()) {
previous.begin();
}
return target;
}

requestManager.clear(target);

//将请求设置到target中
target.setRequest(request);
//分发并执行网络请求Request,此时的requestManager就是
requestManager.track(target, request);

return target;
}

我们可以发现在这个方法中,其实主要的工作有两个:一是构建网络请求的Request,二是执行网络请求对象Request,接下来我们就分别对这两个工作进行分析。

2.3 构建网络请求对象Request

RequestBuilder#buildRequest

1
2
3
4
5
6
7
8
9
10
11
12
13
14
15
16
17
18
19
20
21
22
23
24
25
26
27
28
29
30
31
32
33
34
35
36
37
38
39
40
41
42
43
44
45
46
47
48
49
50
51
52
53
54
55
56
57
58
59
60
61
62
63
64
65
66
67
68
69
70
71
72
73
74
75
76
77
78
79
80
81
82
83
84
85
86
87
88
89
90
91
92
93
94
95
96
97
98
99
100
101
102
103
104
105
private Request buildRequest(
Target<TranscodeType> target,
@Nullable RequestListener<TranscodeType> targetListener,
BaseRequestOptions<?> requestOptions,
Executor callbackExecutor) {
//重点关注buildRequestRecursive方法
return buildRequestRecursive(
target,
targetListener,
/*parentCoordinator=*/ null,
transitionOptions,
requestOptions.getPriority(),
requestOptions.getOverrideWidth(),
requestOptions.getOverrideHeight(),
requestOptions,
callbackExecutor);
}

private Request buildRequestRecursive(
Target<TranscodeType> target,
@Nullable RequestListener<TranscodeType> targetListener,
@Nullable RequestCoordinator parentCoordinator,
TransitionOptions<?, ? super TranscodeType> transitionOptions,
Priority priority,
int overrideWidth,
int overrideHeight,
BaseRequestOptions<?> requestOptions,
Executor callbackExecutor) {

.....
//重点关注buildThumbnailRequestRecursive方法
Request mainRequest =
buildThumbnailRequestRecursive(
target,
targetListener,
parentCoordinator,
transitionOptions,
priority,
overrideWidth,
overrideHeight,
requestOptions,
callbackExecutor);

if (errorRequestCoordinator == null) {
return mainRequest;
}
......
}


private Request buildThumbnailRequestRecursive(
Target<TranscodeType> target,
RequestListener<TranscodeType> targetListener,
@Nullable RequestCoordinator parentCoordinator,
TransitionOptions<?, ? super TranscodeType> transitionOptions,
Priority priority,
int overrideWidth,
int overrideHeight,
BaseRequestOptions<?> requestOptions,
Executor callbackExecutor) {
....
//重点关注,关键代码
Request fullRequest =
obtainRequest(
target,
targetListener,
requestOptions,
coordinator,
transitionOptions,
priority,
overrideWidth,
overrideHeight,
callbackExecutor);
........
}

private Request obtainRequest(
Target<TranscodeType> target,
RequestListener<TranscodeType> targetListener,
BaseRequestOptions<?> requestOptions,
RequestCoordinator requestCoordinator,
TransitionOptions<?, ? super TranscodeType> transitionOptions,
Priority priority,
int overrideWidth,
int overrideHeight,
Executor callbackExecutor) {
//调用了SingleRequest的obtain方法,将load中调用的所有API参数都组装到Request对象当中
//此时的callbackExecutor为含有绑定主线程Handler的线程池
return SingleRequest.obtain(
context,
glideContext,
model,
transcodeClass,
requestOptions,
overrideWidth,
overrideHeight,
priority,
target,
targetListener,
requestListeners,
requestCoordinator,
glideContext.getEngine(),
transitionOptions.getTransitionFactory(),
callbackExecutor);
}

经过一步一步调用,最终将会执行SingleRequest的obtain方法,所以我们继续看这个方法

SingleRequest#obtain方法

1
2
3
4
5
6
7
8
9
10
11
12
13
14
15
16
17
18
19
20
21
22
23
24
25
26
27
28
29
30
31
32
33
34
35
36
37
38
39
40
41
42
43
44
45
46
47
48
49
50
51
52
53
54
55
56
57
58
59
60
61
62
63
64
65
66
67
68
69
70
71
72
73
74
75
76
77
78
79
80
 public static <R> SingleRequest<R> obtain(
Context context,
GlideContext glideContext,
Object model,
Class<R> transcodeClass,
BaseRequestOptions<?> requestOptions,
int overrideWidth,
int overrideHeight,
Priority priority,
Target<R> target,
RequestListener<R> targetListener,
@Nullable List<RequestListener<R>> requestListeners,
RequestCoordinator requestCoordinator,
Engine engine,
TransitionFactory<? super R> animationFactory,
Executor callbackExecutor) {
@SuppressWarnings("unchecked") SingleRequest<R> request =
(SingleRequest<R>) POOL.acquire();
if (request == null) {
//创建SingleRequest对象
request = new SingleRequest<>();
}
//将传入load中的API参数赋值到SingleRequest的成员变量
//最后一个参数为主线程的线程池
request.init(
context,
glideContext,
model,
transcodeClass,
requestOptions,
overrideWidth,
overrideHeight,
priority,
target,
targetListener,
requestListeners,
requestCoordinator,
engine,
animationFactory,
callbackExecutor);
return request;
}
//对成员变量赋值
private synchronized void init(
Context context,
GlideContext glideContext,
Object model,
Class<R> transcodeClass,
BaseRequestOptions<?> requestOptions,
int overrideWidth,
int overrideHeight,
Priority priority,
Target<R> target,
RequestListener<R> targetListener,
@Nullable List<RequestListener<R>> requestListeners,
RequestCoordinator requestCoordinator,
Engine engine,
TransitionFactory<? super R> animationFactory,
Executor callbackExecutor) {
this.context = context;
this.glideContext = glideContext;
this.model = model;
this.transcodeClass = transcodeClass;
this.requestOptions = requestOptions;
this.overrideWidth = overrideWidth;
this.overrideHeight = overrideHeight;
this.priority = priority;
this.target = target;
this.targetListener = targetListener;
this.requestListeners = requestListeners;
this.requestCoordinator = requestCoordinator;
this.engine = engine;
this.animationFactory = animationFactory;
this.callbackExecutor = callbackExecutor;
status = Status.PENDING;

if (requestOrigin == null && glideContext.isLoggingRequestOriginsEnabled()) {
requestOrigin = new RuntimeException("Glide request origin trace");
}
}

这个obtain方法其实就是创建了SingleRequest对象,然后调用了init方法进行成员变量的赋值,所以构建的网络请求对象就是SingleRequest对象。

2.4 执行网络请求对象Request

让我们回到into方法

1
2
3
4
5
6
7
8
9
10
11
12
13
14
15
16
 private <Y extends Target<TranscodeType>> Y into(
@NonNull Y target,
@Nullable RequestListener<TranscodeType> targetListener,
BaseRequestOptions<?> options,
Executor callbackExecutor) {
//构建Requset对象,发出加载图片请求
//最终构建的是SingleRequest对象
Request request = buildRequest(target, targetListener, options, callbackExecutor);
.....
//分发并执行网络请求Request,此时的requestManager就是RequestManager对象
//target为上述创建的DrawableImageViewTarget(如果忘记可以重新看回2.1)
//request就是创建完成的singleRequest对象
requestManager.track(target, request);

return target;
}

这时候我们已经成功构建出了SingleRequest对象了,然后调用了RequestManager的track方法进行分发并执行这个请求

2.4.1 加载前

RequestManager#track

1
2
3
4
5
 synchronized void track(@NonNull Target<?> target, @NonNull Request request) {
targetTracker.track(target);
//执行网络请求
requestTracker.runRequest(request);
}

RequestTracker#runRequest

1
2
3
4
5
6
7
8
9
10
11
12
13
14
15
16
 public void runRequest(@NonNull Request request) {
//将每个提交的请求加入到一个set中,从而实现管理请求
requests.add(request);
//判断Glide当前是否处于暂停状态
if (!isPaused) {
//如果不暂停,则调用SingleRequest的begin方法来执行request
request.begin();
} else {
request.clear();
if (Log.isLoggable(TAG, Log.VERBOSE)) {
Log.v(TAG, "Paused, delaying request");
}
//如果暂停,则先将当前的请求添加到待执行队列里面,等待暂停状态解除后再执行
pendingRequests.add(request);
}
}

在加载图片前,即开启网络请求前我们需要将每个请求加到set中来进行管理请求,并且还需要判断Glide当前的状态,因为我们现在分析的是图片加载流程,显然这里的Glide不是暂停状态,所以会执行request的begin方法,由于在上面我们已经分析了网络请求对象为SingleRequest,所以这里的request为SingleRequest对象。

2.4.2 加载时

接着我们来看看SingleRequest的begin方法

SingleRequest#begin

1
2
3
4
5
6
7
8
9
10
11
12
13
14
15
16
17
18
19
20
21
22
23
24
25
26
27
28
29
30
31
 public synchronized void begin() {
....
//model为load传入的图片URL地址
if (model == null) {
if (Util.isValidDimensions(overrideWidth, overrideHeight)) {
width = overrideWidth;
height = overrideHeight;
}

int logLevel = getFallbackDrawable() == null ? Log.WARN : Log.DEBUG;
//如果传入的URL地址为空,则会调用onLoadFailed
onLoadFailed(new GlideException("Received null model"), logLevel);
return;
}

status = Status.WAITING_FOR_SIZE;
if (Util.isValidDimensions(overrideWidth, overrideHeight)) {
//重点关注
onSizeReady(overrideWidth, overrideHeight);
} else {
 //getsize计算宽高,然后执行onSizeReady方法
target.getSize(this);
}

if ((status == Status.RUNNING || status == Status.WAITING_FOR_SIZE)
&& canNotifyStatusChanged()) {
//在图片请求成功前,会先使用Loading占位图代替最终的图片显示
target.onLoadStarted(getPlaceholderDrawable());
}
.....
}
1. onLoadFailed

从上面的代码中我们可以发现当model为null时,即load传入的图片地址为空时,会调用onLoadFailed方法

SingleRequest#onLoadFailed

1
2
3
4
5
6
7
8
9
10
11
12
13
14
15
16
17
18
19
20
21
22
23
24
25
26
27
28
29
30
31
32
33
34
35
36
37
38
39
40
41
42
43
44
45
46
47
48
49
50
51
52
53
 private synchronized void onLoadFailed(GlideException e, int maxLogLevel) {
.....

loadStatus = null;
status = Status.FAILED;

isCallingCallbacks = true;
try {
//TODO: what if this is a thumbnail request?
boolean anyListenerHandledUpdatingTarget = false;
if (requestListeners != null) {
for (RequestListener<R> listener : requestListeners) {
anyListenerHandledUpdatingTarget |=
listener.onLoadFailed(e, model, target, isFirstReadyResource());
}
}
anyListenerHandledUpdatingTarget |=
targetListener != null
&& targetListener.onLoadFailed(e, model, target, isFirstReadyResource());

if (!anyListenerHandledUpdatingTarget) {
//重点关注这个方法
setErrorPlaceholder();
}
} finally {
isCallingCallbacks = false;
}

notifyLoadFailed();
}


private synchronized void setErrorPlaceholder() {
if (!canNotifyStatusChanged()) {
return;
}

Drawable error = null;
//先获取fallback的图片
if (model == null) {
error = getFallbackDrawable();
}
//若没有设置fallback图,则获取error图
if (error == null) {
error = getErrorDrawable();
}
//若没有error图,则再获取一个loading的占位图
if (error == null) {
error = getPlaceholderDrawable();
}
//target为DrawableImageViewTarget
target.onLoadFailed(error);
}

在onLoadFailed方法中我们只需要关注setErrorPlaceholder方法,而在setErrorPlaceholder中主要的逻辑就是获取错误时需要展示的图片,按fallback>error>loading的优先级来获取错误时的图片,然后调用DrawableImageViewTarget的onLoadFailed方法。通过查看DrawableImageViewTarget,我们可以发现这个类中并没有onLoadFailed方法,所以我们自然而然找父类ImageViewTarget是否存在这个方法.

ImageViewTarget#onloadFailed

1
2
3
4
5
6
7
8
9
10
11
 public void onLoadFailed(@Nullable Drawable errorDrawable) {
super.onLoadFailed(errorDrawable);
setResourceInternal(null);
//调用setDrawable将图片显示出来
setDrawable(errorDrawable);
}

public void setDrawable(Drawable drawable) {
//view就是ImageView,将图片展示出来
view.setImageDrawable(drawable);
}

到这里,错误的图片就被显示出来,从这里我们可以看出Glide显示错误的图片的原则就是:当传入图片的url为null时,会才采用fallback/error/loading的占位图进行代替。

2. onLoadStarted

分析完onLoadFailed,我们回到SingleRequest的begin方法,本来按代码顺序接下来应该分析的是onSizeReady,但是由于这个方法比较复杂并且onLoadStarted与onLoadStarted很类似,所以我们先分析onLoadStarted,把onSizeReady放到最后。

SingleRequest#begin 与onLoadStarted相关的代码

1
2
3
4
5
if ((status == Status.RUNNING || status == Status.WAITING_FOR_SIZE)
&& canNotifyStatusChanged()) {
//在图片请求成功前,会先使用Loading占位图代替最终的图片显示
target.onLoadStarted(getPlaceholderDrawable());
}

看上面这个逻辑就是当图片正在请求时或者等待执行onSizeReady方法时,就执行DrawableImageViewTarget的onLoadStarted方法,从onLoadFailed方法的分析我们已经知道,onLoadFailed方法是在DrawableImageViewTarget父类ImageViewTarget中,故onLoadStarted也是在ImageViewTarget中,至于参数就是loading的占位图。

ImageViewTarget#onLoadStarted

1
2
3
4
5
6
7
8
9
10
11
 public void onLoadStarted(@Nullable Drawable placeholder) {
super.onLoadStarted(placeholder);
setResourceInternal(null);
//在图片请求开始前,会先使用Loading占位图代替最终的图片显示
setDrawable(placeholder);
}

public void setDrawable(Drawable drawable) {
//将图片展示出来
view.setImageDrawable(drawable);
}

然后将loading的占位图显示出来,即图片请求成功前,会使用Loading占位图代替最终的图片显示。这也算是我们经常使用的一个功能了。

3. onSizeReady

到这里我们终于要分析重头戏onSizeReady了,我们先贴出相关代码

SingleRequest#begin 与onSizeReady相关的代码

1
2
3
4
5
6
7
8
9
10
11
//图片加载有两种情况:
//1.使用了override()的API为图片指定了固定宽高
//2.无使用
if (Util.isValidDimensions(overrideWidth, overrideHeight)) {
//第一种情况,指定了宽高的话调用onSizeReady加载
onSizeReady(overrideWidth, overrideHeight);
} else {
 //getsize计算宽高,然后执行onSizeReady方法
//(从DrawableImageViewTarget中向上追踪,会在ViewTarget中发现这个方法)
target.getSize(this);
}

这个我们只分析onSizeReady,因为getSize方法最终也是会调用onSizeReady的。

SingleRequest#onSizeReady

1
2
3
4
5
6
7
8
9
10
11
12
13
14
15
16
17
18
19
20
21
22
23
24
25
26
27
28
29
30
@Override
public synchronized void onSizeReady(int width, int height) {
....
status = Status.RUNNING;

loadStatus =
//重点关注,调用Engine的load构建任务
//重点关注倒数第二个参数,传入自身SingleRequest,在回调的时候会使用
//重点关注倒数第一个参数,传入有绑定主线程的Handler的线程池callbackExectuter
engine.load(
glideContext,
model,
requestOptions.getSignature(),
this.width,
this.height,
requestOptions.getResourceClass(),
transcodeClass,
priority,
requestOptions.getDiskCacheStrategy(),
requestOptions.getTransformations(),
requestOptions.isTransformationRequired(),
requestOptions.isScaleOnlyOrNoTransform(),
requestOptions.getOptions(),
requestOptions.isMemoryCacheable(),
requestOptions.getUseUnlimitedSourceGeneratorsPool(),
requestOptions.getUseAnimationPool(),
requestOptions.getOnlyRetrieveFromCache(),
this,
callbackExecutor);
}

可以看出onSizeReady的实现交给了Engine的load方法实现了,这个Engine对象就是在第一部曲with中Glide构建时提到的执行引擎,在这里还需要特别注意的是传给load的最后两个参数,因为这两个参数在后面的分析需要用到。

构建任务

Engine#load

1
2
3
4
5
6
7
8
9
10
11
12
13
14
15
16
17
18
19
20
21
22
23
24
25
26
27
28
29
30
31
32
33
34
35
36
37
38
39
40
41
42
43
44
45
46
47
48
49
50
51
52
53
54
55
56
57
58
59
60
61
62
63
64
65
66
67
68
69
70
71
 public synchronized <R> LoadStatus load(
GlideContext glideContext,
Object model,
Key signature,
int width,
int height,
Class<?> resourceClass,
Class<R> transcodeClass,
Priority priority,
DiskCacheStrategy diskCacheStrategy,
Map<Class<?>, Transformation<?>> transformations,
boolean isTransformationRequired,
boolean isScaleOnlyOrNoTransform,
Options options,
boolean isMemoryCacheable,
boolean useUnlimitedSourceExecutorPool,
boolean useAnimationPool,
boolean onlyRetrieveFromCache,
ResourceCallback cb,
Executor callbackExecutor) {

.....
//从缓存中查找key对应的任务
EngineJob<?> current = jobs.get(key, onlyRetrieveFromCache);
if (current != null) {
//如果走到这说明该任务已经正在执行了,无需再次构建执行
//可以先不看,从后面分析完后重新回头看这个
current.addCallback(cb, callbackExecutor);
if (VERBOSE_IS_LOGGABLE) {
logWithTimeAndKey("Added to existing load", startTime, key);
}
return new LoadStatus(cb, current);
}
//走到这,说明这是个新任务
//创建EngineJob对象,用来开启线程(异步加载图片)
EngineJob<R> engineJob =
engineJobFactory.build(
key,
isMemoryCacheable,
useUnlimitedSourceExecutorPool,
useAnimationPool,
onlyRetrieveFromCache);
//创建DecodeJob对象,用来对图片解码
DecodeJob<R> decodeJob =
decodeJobFactory.build(
glideContext,
model,
key,
signature,
width,
height,
resourceClass,
transcodeClass,
priority,
diskCacheStrategy,
transformations,
isTransformationRequired,
isScaleOnlyOrNoTransform,
onlyRetrieveFromCache,
options,
engineJob);
//添加到任务缓存中
jobs.put(key, engineJob);
//现在可以不看
//在获取数据回调进行照片展示时会重新分析到这个方法
engineJob.addCallback(cb, callbackExecutor);
//执行任务
engineJob.start(decodeJob);
...
return new LoadStatus(cb, engineJob);
}

结合上面的代码和注释,我们可以知道Engine.load的主要工作:

  • 创建EngineJob对象,用来开启线程
  • 创建DeodeJob对象,用来对照片进行解码
  • 添加回调的对象和线程池
  • 执行任务
执行任务

EngineJob#start

1
2
3
4
5
6
7
8
9
 public synchronized void start(DecodeJob<R> decodeJob) {
this.decodeJob = decodeJob;
//获取线程池
GlideExecutor executor = decodeJob.willDecodeFromCache()
? diskCacheExecutor
: getActiveSourceExecutor();
//执行DecodeJob的run方法
executor.execute(decodeJob);
}

调用线程池的execute方法,故接下来会执行DecodeJob的run方法

DecodeJob#run

1
2
3
4
5
6
7
8
9
10
11
12
13
14
15
16
17
18
19
20
21
22
23
24
25
26
27
28
29
30
31
32
33
34
35
36
37
38
39
40
41
42
43
44
45
46
47
48
49
50
51
52
53
54
55
56
57
58
59
60
61
62
63
64
65
66
67
68
69
70
71
72
73
74
75
76
77
78
79
80
81
82
83
84
85
86
87
88
89
90
91
92
 public void run() {
....
try {
if (isCancelled) {
notifyFailed();
return;
}
//重点关注,调用runWrapped
runWrapped();
}
....
}

private void runWrapped() {
switch (runReason) {
case INITIALIZE:
//获取任务场景
stage = getNextStage(Stage.INITIALIZE);
//获取这个场景的执行者
currentGenerator = getNextGenerator();
//重点关注,执行者执行任务
runGenerators();
break;
case SWITCH_TO_SOURCE_SERVICE:
runGenerators();
break;
case DECODE_DATA:
decodeFromRetrievedData();
break;
default:
throw new IllegalStateException("Unrecognized run reason: " + runReason);
}
}
//获取任务场景
private Stage getNextStage(Stage current) {
switch (current) {
case INITIALIZE:
//若配置的缓存策略允许从资源缓存中读取数据,则返回Stage.RESOURCE_CACHE
return diskCacheStrategy.decodeCachedResource()
? Stage.RESOURCE_CACHE : getNextStage(Stage.RESOURCE_CACHE);
case RESOURCE_CACHE:
//若配置的缓存策略允许从源数据缓存读取数据,则返回Stage.DATA_CACHE
return diskCacheStrategy.decodeCachedData()
? Stage.DATA_CACHE : getNextStage(Stage.DATA_CACHE);
case DATA_CACHE:
//若只能允许从缓存中读取数据,则直接FINISH,否则返回Stage.SOURCE,表示加载新的资源
return onlyRetrieveFromCache ? Stage.FINISHED : Stage.SOURCE;
case SOURCE:
case FINISHED:
return Stage.FINISHED;
default:
throw new IllegalArgumentException("Unrecognized stage: " + current);
}
}

//获取这个场景的执行者
private DataFetcherGenerator getNextGenerator() {
switch (stage) {
case RESOURCE_CACHE:
// 资源磁盘缓存的执行者
return new ResourceCacheGenerator(decodeHelper, this);
case DATA_CACHE:
// 源数据磁盘缓存的执行者
return new DataCacheGenerator(decodeHelper, this);
case SOURCE:
// 无缓存, 获取数据的源的执行者
return new SourceGenerator(decodeHelper, this);
case FINISHED:
return null;
default:
throw new IllegalStateException("Unrecognized stage: " + stage);
}
}

private void runGenerators() {
currentThread = Thread.currentThread();
startFetchTime = LogTime.getLogTime();
boolean isStarted = false;
// 调用 DataFetcherGenerator.startNext() 执行了请求操作
//我们这里主要分析的是无缓存情况,所以这里的DataFetcherGenerator应该是SourceGenerator
while (!isCancelled && currentGenerator != null
&& !(isStarted = currentGenerator.startNext())) {
stage = getNextStage(stage);
currentGenerator = getNextGenerator();

if (stage == Stage.SOURCE) {
reschedule();
return;
}
}
.....
}

怎么执行任务呢?大体上可以分为三个步骤:

  1. 获取任务场景
  2. 获取任务场景的执行者
  3. 执行者执行任务

场景和执行者是一一对应的,由于我们现在分析的是第一次加载图片,并且没有配置缓存策略,所以对应的任务场景为无缓存情况,与之相对应的执行者就是SourceGenerator对象,所以当执行任务时调用的是SourceGenerator的startNext方法

SourceGenerator#startNext

1
2
3
4
5
6
7
8
9
10
11
12
13
14
15
16
17
18
public boolean startNext() {
......
boolean started = false;
while (!started && hasNextModelLoader()) {
//从DecodeHelper的数据加载集合中, 获取一个数据加载器
loadData = helper.getLoadData().get(loadDataListIndex++);
if (loadData != null
&& (helper.getDiskCacheStrategy().isDataCacheable(loadData.fetcher.getDataSource())
|| helper.hasLoadPath(loadData.fetcher.getDataClass()))) {
started = true;

//使用加载器fetcher执行数据加载
//此fetcher为HttpUrlFetcher对象
loadData.fetcher.loadData(helper.getPriority(), this);
}
}
return started;
}
获取数据加载器

首先来看看如何得到数据加载器的集合

DecodeHelper#getLoadData

1
2
3
4
5
6
7
8
9
10
11
12
13
14
15
16
17
18
19
20
21
22
23
24
 List<LoadData<?>> getLoadData() {
if (!isLoadDataSet) {
isLoadDataSet = true;
loadData.clear();
//从Glide注册的register中获取modelLoaders
List<ModelLoader<Object, ?>> modelLoaders = glideContext.getRegistry().getModelLoaders(model);
//遍历modelLoaders
for (int i = 0, size = modelLoaders.size(); i < size; i++) {
//此时分析的model为url的string格式,该其中一个实现类为StringLoader
ModelLoader<Object, ?> modelLoader = modelLoaders.get(i);
//通过StringLoader构造loadData
//经过Glide的registry分析后最终会执行HttpGlideUrlLoader的buildLoadData方法
//最终的loadData封装了HttpUrlFetcher对象
LoadData<?> current =
modelLoader.buildLoadData(model, width, height, options);
if (current != null) {
//添加到loadData集合中
loadData.add(current);
}
}
}
//最终返回的是含有HttpUrlFetcher对象的loadData集合
return loadData;
}

我们来一步步解剖这个方法,首先需要从Glide注册的registry中获取modelLoaders,因为我们全文以String为例子,所以这里的model将是String类型的。

!!!注意:在注册表中注册的都是ModelLoader的实现ModelLoaderFactory静态工厂类,当调用Registry的getModelLoaders时会调用工厂类中的build方法,这里就不贴出这其中的过程了,现在我们只需要知道当调用getModelLoaders方法时会调用注册表中对应工厂类的build方法。现在我们需要回头看看Glide构建时的注册表,看看model为String类型时有那些ModelLoader的静态工厂类,下面只列举几个:

Glide#Glide构造器

1
2
3
4
5
6
registry
//重点关注StringLoader.StreamFactory()
.append(String.class, InputStream.class, new StringLoader.StreamFactory())
.append(String.class, ParcelFileDescriptor.class, new StringLoader.FileDescriptorFactory())
.append(
String.class, AssetFileDescriptor.class, new StringLoader.AssetFileDescriptorFactory())

这里我们以StringLoader.StreamFactory为例子,由于调用了getModelLoaders方法,所以会执行StringLoader.StreamFactory的build方法

StringLoader.StreamFactory()

1
2
3
4
5
6
7
8
9
10
11
12
13
public static class StreamFactory implements ModelLoaderFactory<String, InputStream> {

@NonNull
@Override
public ModelLoader<String, InputStream> build(
@NonNull MultiModelLoaderFactory multiFactory) {
//从Glide的registry的models注册表可以得知
//这时候的multiFactory为HttpUriLoader.Factory()
//不断追踪下去得知最终参数里返回的是HttpGlideUrlLoader对象
return new StringLoader<>(multiFactory.build(Uri.class, InputStream.class));
}
.....
}

从build方法中,构建了StringLoader对象,但是其中的参数又调用了另外一个MultiModelLoaderFactory,这时候我们需要看会Glide的注册表中,然后找到参数为Uri.class, InputStream.class时构建的MultiModelLoaderFactory对象

Glide#Glide的构造器

1
2
3
registry       
//重点关注HttpUriLoader.Factory()
.append(Uri.class, InputStream.class, new HttpUriLoader.Factory())

可以发现这时候的MultiModelLoaderFactory对象将会是HttpUriLoader.Factory()类型的,所以我们还需要看看其中的build方法

HttpUriLoader.Factory#build

1
2
3
4
5
public ModelLoader<Uri, InputStream> build(MultiModelLoaderFactory multiFactory) {
//根据Glide中的registry中的Models注册表可以知道
//这时候的multiFactory为HttpGlideUrlLoader.Factory()
return new HttpUriLoader(multiFactory.build(GlideUrl.class, InputStream.class));
}

还是跟上面一样的步骤,继续查看Glide的注册表,找出参数为GlideUrl.class, InputStream.class的MultiModelLoaderFactory对象

1
2
3
   registry    
//重点关注HttpGlideUrlLoader
.append(GlideUrl.class, InputStream.class, new HttpGlideUrlLoader.Factory())

再看看HttpGlideUrlLoader.Factory的build方法

HttpGlideUrlLoader.Factory#build

1
2
3
4
public ModelLoader<GlideUrl, InputStream> build(MultiModelLoaderFactory multiFactory) {
//最终返回的是HttpGlideUrlLoader对象
return new HttpGlideUrlLoader(modelCache);
}

这里的build方法返回的是HttpGlideUrlLoader类型,所以最终构建StringLoader对象中的参数将是HttpGlideUrlLoader类型的。于是我们看看StringLoader的构造器的实现。

StringLoader#StringLoader构造器

1
2
3
4
public StringLoader(ModelLoader<Uri, Data> uriLoader) {
//此时的uriLoader为HttpGlideUrlLoader对象,赋值给静态成员变量
this.uriLoader = uriLoader;
}

构建器就是简单的给成员变量赋值,此时的uriLoader为HttpGlideUrlLoader对象。这就是getModelLoaders所做的事,我们继续分析DecodeHelper的getLoadData方法,当获取到了String的modelLoaders后会遍历每一个modelLoader,然后调用modelLoader的buildLoadData来构造loadData对象,这里我们直接用上面分析得到的StringLoader为例,让我们看看StringLoader的buildLoadData的实现

StringLoader#buildLoadData

1
2
3
4
5
6
7
8
9
 public LoadData<Data> buildLoadData(@NonNull String model, int width, int height,
@NonNull Options options) {
Uri uri = parseUri(model);
if (uri == null || !uriLoader.handles(uri)) {
return null;
}
//此时的uriLoader为HttpGlideUrlLoader对象
return uriLoader.buildLoadData(uri, width, height, options);
}

由上面分析我们已经知道此时StringLoader中的uriLoader为HttpGlideUrlLoader对象,所以会继续调用HttpGlideUrlLoader的buildLoadData方法

HttpGlideUrlLoader

1
2
3
4
5
6
7
8
9
10
11
12
13
14
15
16
 public LoadData<InputStream> buildLoadData(@NonNull GlideUrl model, int width, int height,
@NonNull Options options) {
// GlideUrls memoize parsed URLs so caching them saves a few object instantiations and time
// spent parsing urls.
GlideUrl url = model;
if (modelCache != null) {
url = modelCache.get(model, 0, 0);
if (url == null) {
modelCache.put(model, 0, 0, model);
url = model;
}
}
int timeout = options.get(TIMEOUT);
//创建了一个LoadData对象, 并且封装了HttpUrlFetcher对象
return new LoadData<>(url, new HttpUrlFetcher(url, timeout));
}

其它代码我们并不需要过多的关注,只需要关注最后的返回值,可以发现最后返回的是封装了HttpUrlFetcher的LoadData对象,这样getLoadData方法获取到的就是封装了HttpUrlFetcher的LoadData对象。让我们回到SourceGenerator的startNext方法。

SourceGenerator#startNext

1
2
3
4
5
6
7
8
9
10
11
12
13
14
15
16
17
18
public boolean startNext() {
......
boolean started = false;
while (!started && hasNextModelLoader()) {
//最终获取的的对象就是封装了HttpUrlFetcher的LoadData对象
loadData = helper.getLoadData().get(loadDataListIndex++);
if (loadData != null
&& (helper.getDiskCacheStrategy().isDataCacheable(loadData.fetcher.getDataSource())
|| helper.hasLoadPath(loadData.fetcher.getDataClass()))) {
started = true;

//使用加载器fetcher执行数据加载
//此fetcher为HttpUrlFetcher对象
loadData.fetcher.loadData(helper.getPriority(), this);
}
}
return started;
}

上面已经分析了loadData是封装了HttpUrlFetcher的LoadData对象,所以执行数据加载其实就是调用了HttpUrlFetcher的loadData方法。

执行数据加载

HttpUrlFetcher#loadData

1
2
3
4
5
6
7
8
9
10
11
12
13
14
15
16
17
18
19
20
21
22
23
24
25
26
27
28
29
30
31
32
33
34
35
36
37
38
39
40
41
42
43
44
45
46
47
48
49
50
51
52
53
54
55
56
57
58
59
60
61
62
63
 public void loadData(@NonNull Priority priority,
@NonNull DataCallback<? super InputStream> callback) {
long startTime = LogTime.getLogTime();
try {
//获取网络图片的输入流
InputStream result = loadDataWithRedirects(glideUrl.toURL(), 0, null, glideUrl.getHeaders());
//将inputStream回调出去,callback为DataCallback
callback.onDataReady(result);
}
......
}


//网络请求代码,利用了HttpURLConnection进行网络请求
private InputStream loadDataWithRedirects(URL url, int redirects, URL lastUrl,
Map<String, String> headers) throws IOException {
......
//静态工厂模式创建HttpUrlConnection对象
urlConnection = connectionFactory.build(url);
for (Map.Entry<String, String> headerEntry : headers.entrySet()) {
urlConnection.addRequestProperty(headerEntry.getKey(), headerEntry.getValue());
}
//设置连接超时时间为2500ms
urlConnection.setConnectTimeout(timeout);
//设置读取超时时间为2500ms
urlConnection.setReadTimeout(timeout);
//不使用http缓存
urlConnection.setUseCaches(false);
urlConnection.setDoInput(true);

// Stop the urlConnection instance of HttpUrlConnection from following redirects so that
// redirects will be handled by recursive calls to this method, loadDataWithRedirects.
urlConnection.setInstanceFollowRedirects(false);

// Connect explicitly to avoid errors in decoders if connection fails.
urlConnection.connect();
// Set the stream so that it's closed in cleanup to avoid resource leaks. See #2352.
stream = urlConnection.getInputStream();
if (isCancelled) {
return null;
}
final int statusCode = urlConnection.getResponseCode();
if (isHttpOk(statusCode)) {
//请求成功
return getStreamForSuccessfulRequest(urlConnection);
}
......
}

private InputStream getStreamForSuccessfulRequest(HttpURLConnection urlConnection)
throws IOException {
if (TextUtils.isEmpty(urlConnection.getContentEncoding())) {
int contentLength = urlConnection.getContentLength();
stream = ContentLengthInputStream.obtain(urlConnection.getInputStream(), contentLength);
} else {
if (Log.isLoggable(TAG, Log.DEBUG)) {
Log.d(TAG, "Got non empty content encoding: " + urlConnection.getContentEncoding());
}
stream = urlConnection.getInputStream();
}
//最终返回的是图片的InputStream对象,还未开始读取数据
return stream;
}

可以发现执行数据加载有两个工作,首先是获取数据的输入流,这里采取的是HttpURLConnection进行网络请求,最终获取到的是数据的InputStream对象,记住这时候并未开始读取数据。

返回数据

当获取到输入流后,还需要将这个输入流返回出去,怎么返回呢?

1
callback.onDataReady(result);

可以发现这里使用的是回调的方法将数据的输入流回调出去。此时callbak为DataCallback对象,根据回调的使用我们知道下一步应该要找到实现DataCallback接口的类,怎么找呢?这时候就需要往回找,调用loadData方法的是在SourceGenerator的startNext方法,所以我们首选目标就是这个SourceGenerator类

SourceGenerator#onDataReady

1
2
3
4
5
6
7
8
9
10
11
12
13
14
15
16
17
class SourceGenerator implements DataFetcherGenerator,
DataFetcher.DataCallback<Object>,
DataFetcherGenerator.FetcherReadyCallback {

........
public void onDataReady(Object data) {
DiskCacheStrategy diskCacheStrategy = helper.getDiskCacheStrategy();
if (data != null && diskCacheStrategy.isDataCacheable(loadData.fetcher.getDataSource())) {
dataToCache = data;
....
} else {
//继续回调FetcherReadyCallback的onDataFetcherReady方法,将data回调出去
cb.onDataFetcherReady(loadData.sourceKey, data, loadData.fetcher,
loadData.fetcher.getDataSource(), originalKey);
}
}
}

机智如我们!果然SourceGenerator类实现了DataFetcher.DataCallback这个接口,并且在这个类找到了onDataReady方法,这个方法还是选择回调,回调了FetcherReadyCallback的onDataFetcherReady方法,于是我们在往回找,并在心中默念:在哪个类中调用了SourceGenerator的startNext方法呢?然后你就会发现是在DecodeJob的run方法中调用了startNext这个方法,然后马上看看DecodeJob是否实现了onDataFetcherReady接口!

DecodeJob#onDataFetcherReady

1
2
3
4
5
6
7
8
9
10
11
12
13
14
15
16
17
18
19
20
21
22
23
24
25
26
27
28
29
30
31
32
33
34
35
36
37
38
39
40
41
42
43
44
  
class DecodeJob<R> implements DataFetcherGenerator.FetcherReadyCallback,
Runnable,
Comparable<DecodeJob<?>>,
Poolable {


.......
public void onDataFetcherReady(Key sourceKey, Object data, DataFetcher<?> fetcher,
DataSource dataSource, Key attemptedKey) {
.......
if (Thread.currentThread() != currentThread) {
runReason = RunReason.DECODE_DATA;
callback.reschedule(this);
} else {
GlideTrace.beginSection("DecodeJob.decodeFromRetrievedData");
try {
//解析获取的数据
decodeFromRetrievedData();
} finally {
GlideTrace.endSection();
}
}
}

private void decodeFromRetrievedData() {
....
try {
//获取解析后
resource = decodeFromData(currentFetcher, currentData, currentDataSource);
} catch (GlideException e) {
e.setLoggingDetails(currentAttemptingKey, currentDataSource);
throwables.add(e);
}
if (resource != null) {
//通知外界资源获取成功
notifyEncodeAndRelease(resource, currentDataSource);
} else {
runGenerators();
}
}


}

哇!超神了!果然是这样!onDataFetcherReady方法中主要工作有两件:

  1. 解析获取的数据
  2. 返回图片资源

我们先看看是如何解析数据的

2.5 解析数据

DecodeJob

1
2
3
4
5
6
7
8
9
10
11
12
13
14
15
16
17
18
19
20
21
22
23
24
25
26
27
28
29
30
31
32
33
34
35
36
 private <Data> Resource<R> decodeFromData(DataFetcher<?> fetcher, Data data,
DataSource dataSource) throws GlideException {
try {
......

//重点关注decodeFromFetcher方法
Resource<R> result = decodeFromFetcher(data, dataSource);
if (Log.isLoggable(TAG, Log.VERBOSE)) {
logWithTimeAndKey("Decoded result " + result, startTime);
}
return result;
}
......
}

private <Data> Resource<R> decodeFromFetcher(Data data, DataSource dataSource)
throws GlideException {
//获取当前数据类的解析器LoadPath,此时的data为InputStream对象
LoadPath<Data, ?, R> path = decodeHelper.getLoadPath((Class<Data>) data.getClass());
//通过解析器来解析数据
return runLoadPath(data, dataSource, path);
}

private <Data, ResourceType> Resource<R> runLoadPath(Data data, DataSource dataSource,
LoadPath<Data, ResourceType, R> path) throws GlideException {
Options options = getOptionsWithHardwareConfig(dataSource);
//此时的data为InputStream对象,故rewinder为InputStreamRewinder对象
DataRewinder<Data> rewinder = glideContext.getRegistry().getRewinder(data);
try {
//将数据解析转移到LoadPath.load方法中
return path.load(
rewinder, options, width, height, new DecodeCallback<ResourceType>(dataSource));
} finally {
rewinder.cleanup();
}
}

这里的rewinder的获取跟modelLoaders的获取一样需要重新看Glide构建中的注册表registry,在这里不再详细说明,因为data为InputStream对象,所以rewinder为InputStreamRewinder对象,然后调用LoadPath的load方法实现解析数据

LoadPath

1
2
3
4
5
6
7
8
9
10
11
12
13
14
15
16
17
18
19
20
21
22
23
24
25
26
27
28
29
30
31
32
33
34
35
36
public Resource<Transcode> load(DataRewinder<Data> rewinder, @NonNull Options options, int width,
int height, DecodePath.DecodeCallback<ResourceType> decodeCallback) throws GlideException {
List<Throwable> throwables = Preconditions.checkNotNull(listPool.acquire());
try {
//重点关注
return loadWithExceptionList(rewinder, options, width, height, decodeCallback, throwables);
} finally {
listPool.release(throwables);
}
}

private Resource<Transcode> loadWithExceptionList(DataRewinder<Data> rewinder,
@NonNull Options options,
int width, int height, DecodePath.DecodeCallback<ResourceType> decodeCallback,
List<Throwable> exceptions) throws GlideException {
Resource<Transcode> result = null;
//遍历DecodePath集合
for (int i = 0, size = decodePaths.size(); i < size; i++) {
DecodePath<Data, ResourceType, Transcode> path = decodePaths.get(i);
try {
//调用DecodePath.decode真正进行数据解析
result = path.decode(rewinder, width, height, options, decodeCallback);
} catch (GlideException e) {
exceptions.add(e);
}
if (result != null) {
break;
}
}

if (result == null) {
throw new GlideException(failureMessage, new ArrayList<>(exceptions));
}

return result;
}

DecodePath

1
2
3
4
5
6
7
8
9
10
11
 public Resource<Transcode> decode(DataRewinder<DataType> rewinder, int width, int height,
@NonNull Options options, DecodeCallback<ResourceType> callback) throws GlideException {
//获取到Resource<Bitmap>对象
Resource<ResourceType> decoded = decodeResource(rewinder, width, height, options);
//将资源转化为目标效果,如在构建request时设置的CenterCrop
Resource<ResourceType> transformed = callback.onResourceDecoded(decoded);
//将数据转化为目标格式,将Resource<Bitmap>转换为LazyBitmapDrawableResource对象
//可通过LazyBitmapDrawableResource的get获取到BitmapDrawable对象
//该transcoder为BitmapDrawableTranscoder
return transcoder.transcode(transformed, options);
}

LoadPath的load方法最终会调用DecodePath的decode来解析数据,DecodePath的decode的主要工作就是获取到Resource对象,然后还要将Resource对象转化成LazyBitmapDrawableResource。考虑到篇幅问题,在这里就不分析如何得到Resource对象,只分析如何将数据转化为目标格式,可以通过Glide构造中的注册表中找出Bitmap转化成Drawable的转化器为BitmapDrawableTranscoder,所以实际上调用了BitmapDrawableTranscoder的transcode来进行转换

BitmapDrawableTranscoder#transcode

1
2
3
4
5
public Resource<BitmapDrawable> transcode(@NonNull Resource<Bitmap> toTranscode,
@NonNull Options options) {
//获取LazyBitmapDrawableResource对象
return LazyBitmapDrawableResource.obtain(resources, toTranscode);
}

LazyBitmapDrawableResource

1
2
3
4
5
6
7
8
9
10
11
12
13
 public static Resource<BitmapDrawable> obtain(
@NonNull Resources resources, @Nullable Resource<Bitmap> bitmapResource) {
if (bitmapResource == null) {
return null;
}
//创建了一个LazyBitmapDrawableResource对象
return new LazyBitmapDrawableResource(resources, bitmapResource);
}

public BitmapDrawable get() {
//返回一个BitmapDrawable对象
return new BitmapDrawable(resources, bitmapResource.get());
}

追踪下去可以发现transcode最终会得到一个封装了Resource的对象,然后看LazyBitmapDrawableResource的get方法,可以得到一个BitmapDrawable对象,即目标格式。到这里就成功将数据解析成LazyBitmapDrawableResource对象。

2.6 在主线程中显示图片

既然解析完数据,剩下的工作就是将数据显示出来,于是我们得重新看回DecodeJob的decodeFromRetrievedData方法

DecodeJob

1
2
3
4
5
6
7
8
9
10
11
12
13
14
15
16
17
18
19
20
21
22
23
24
25
26
27
28
29
30
31
  private void decodeFromRetrievedData() {
....
try {
//解析成功后resource为封装了Resource<Bitmap>的LazyBitmapDrawableResource对象
//可通过get方法获取到BitmapDrawable对象
resource = decodeFromData(currentFetcher, currentData, currentDataSource);
} catch (GlideException e) {
e.setLoggingDetails(currentAttemptingKey, currentDataSource);
throwables.add(e);
}
if (resource != null) {
//通知外界资源获取成功
notifyEncodeAndRelease(resource, currentDataSource);
} else {
runGenerators();
}
}

private void notifyEncodeAndRelease(Resource<R> resource, DataSource dataSource) {
.....
//重点关注
notifyComplete(result, dataSource);
......

}

private void notifyComplete(Resource<R> resource, DataSource dataSource) {
setNotifiedOrThrow();
//回调,注意此时的callback为EngineJob(可回头看Engine中DecodeJob的创建)
callback.onResourceReady(resource, dataSource);
}

2.6.1 回调数据

嘻嘻,看到最后又来到了我们熟悉的回调方法,看到这个callback你可能会一脸茫然,这个callback哪个对象呢?别急,让我们来一步步分析。

首先先确定下这个notifyComplete是在DecodeJob类中,因此callback应该是其成员变量,然后我们得找出赋值的地方

1
2
3
4
5
6
7
8
9
10
11
12
13
14
15
16
17
18
19
20
21
22
23
24
25
26
27
28
29
30
31
32
33
34
35
36
37
38
39
40
41
42
43
44
45
46
47
48
49
//重点关注倒数第二个参数,callback的类型为CallBack
DecodeJob<R> init(
GlideContext glideContext,
Object model,
EngineKey loadKey,
Key signature,
int width,
int height,
Class<?> resourceClass,
Class<R> transcodeClass,
Priority priority,
DiskCacheStrategy diskCacheStrategy,
Map<Class<?>, Transformation<?>> transformations,
boolean isTransformationRequired,
boolean isScaleOnlyOrNoTransform,
boolean onlyRetrieveFromCache,
Options options,
Callback<R> callback,
int order) {
decodeHelper.init(
glideContext,
model,
signature,
width,
height,
diskCacheStrategy,
resourceClass,
transcodeClass,
priority,
options,
transformations,
isTransformationRequired,
isScaleOnlyOrNoTransform,
diskCacheProvider);
this.glideContext = glideContext;
this.signature = signature;
this.priority = priority;
this.loadKey = loadKey;
this.width = width;
this.height = height;
this.diskCacheStrategy = diskCacheStrategy;
this.onlyRetrieveFromCache = onlyRetrieveFromCache;
this.options = options;
this.callback = callback;
this.order = order;
this.runReason = RunReason.INITIALIZE;
this.model = model;
return this;
}

很容易的我们发现在init方法会为callback赋值,这时候得记住callback参数的具体位置为倒数第二个。这时候你会想:哪里会调用DecodeJob的init方法呢?然后揣摩:既然是赋值估计会在构建DecodeJob时候会调用到。于是问题就转换为:上文是在哪个地方构建了DecodeJob?然后心里默念:DecodeJob是用来执行任务的,所以应该在构建任务的时候会调用!(不过大多数的情形是:脑子里一片空白,压根想不出来,反正笔者在这里就想不出来。所以这时候就可以直接往上找到DecodeJob首次出现的位置),最终是会在Engine的load中找到DecodeJob的构建

Engine#load

1
2
3
4
5
6
7
8
9
10
11
12
13
14
15
16
17
18
19
20
21
22
23
24
25
26
27
28
29
30
31
32
33
34
35
36
37
38
39
40
41
42
43
44
45
46
47
48
49
50
51
52
53
54
55
56
57
58
59
60
public synchronized <R> LoadStatus load(....){
//重点关注倒数最后一个参数
DecodeJob<R> decodeJob =
decodeJobFactory.build(
glideContext,
model,
key,
signature,
width,
height,
resourceClass,
transcodeClass,
priority,
diskCacheStrategy,
transformations,
isTransformationRequired,
isScaleOnlyOrNoTransform,
onlyRetrieveFromCache,
options,
engineJob);

}
//重点关注最后一个参数
<R> DecodeJob<R> build(GlideContext glideContext,
Object model,
EngineKey loadKey,
Key signature,
int width,
int height,
Class<?> resourceClass,
Class<R> transcodeClass,
Priority priority,
DiskCacheStrategy diskCacheStrategy,
Map<Class<?>, Transformation<?>> transformations,
boolean isTransformationRequired,
boolean isScaleOnlyOrNoTransform,
boolean onlyRetrieveFromCache,
Options options,
DecodeJob.Callback<R> callback) {
DecodeJob<R> result = Preconditions.checkNotNull((DecodeJob<R>) pool.acquire());
return result.init(
glideContext,
model,
loadKey,
signature,
width,
height,
resourceClass,
transcodeClass,
priority,
diskCacheStrategy,
transformations,
isTransformationRequired,
isScaleOnlyOrNoTransform,
onlyRetrieveFromCache,
options,
callback,
creationOrder++);
}
}

在上面的代码中首先调用了DecodeJobFactory的build方法来构建DecodeJob,DecodeJobFactory是Engine的内部类,然后接着看DecodeJobFactory的build方法,哇!跟我们想的完全一样!build方法中调用了DecodeJob的init方法,找到后可别忘了我们的任务是干嘛的!找到callback的值,于是看回build的callback的参数位置,在最后一个,然后往回看Engine的load中调用build的最后一个参数!engineJob!没错最后找到的callback的类型应该是EngineJob类型的,其实EngineJob是实现了DecodeJob.Callback接口的。所以接下来就会回调EngineJob的onResourceReady方法

EngineJob#onResourceReady

1
2
3
4
5
6
7
8
9
10
11
12
13
14
15
16
17
18
19
20
21
22
23
24
25
26
27
28
29
30
 public void onResourceReady(Resource<R> resource, DataSource dataSource) {
synchronized (this) {
this.resource = resource;
this.dataSource = dataSource;
}
//重点关注
notifyCallbacksOfResult();
}

void notifyCallbacksOfResult() {
ResourceCallbacksAndExecutors copy;
Key localKey;
EngineResource<?> localResource;
synchronized (this) {
......

//重点关注cbs的类型
//查找cbs里面的类型
copy = cbs.copy();
.....
}
//通知上层Engine的任务完成了
listener.onEngineJobComplete(this, localKey, localResource);

for (final ResourceCallbackAndExecutor entry : copy) {
//回调给ImageViewTarget来展示资源
entry.executor.execute(new CallResourceReady(entry.cb));
}
decrementPendingCallbacks();
}

2.6.2 回到主线程

又到了确定参数类型的时刻了,赶紧召唤福尔摩斯上线!首先我们先确定EngineJob的onResourceReady方法中最重要的代码片

1
2
3
4
for (final ResourceCallbackAndExecutor entry : copy) {
//回调给ImageViewTarget来展示资源
entry.executor.execute(new CallResourceReady(entry.cb));
}

在确定分析线程池的execute的方法前,我们需要做的事有:

  • 确定entry.executor类型
  • 确定entry.cb类型

现在我们知道entry为ResourceCallbackAndExecutor方法,所以我们来看看这个类以及构造器

ResourceCallbackAndExecutor

1
2
3
4
5
6
7
8
9
static final class ResourceCallbackAndExecutor {
final ResourceCallback cb;
final Executor executor;

ResourceCallbackAndExecutor(ResourceCallback cb, Executor executor) {
this.cb = cb;
this.executor = executor;
}
}

可以发现executor和cb都是ResourceCallbackAndExecutor中的成员变量,在构造时被赋值,所以我们需要找到构造ResourceCallbackAndExecutor对象的地方,自然而然我们会锁定上面copy这个变量

EngineJob

1
2
3
4
5
6
7
8
9
10
11
12
13
14
15
16
17
18
19
20
21
22
23
24
25
26
27
28
29
30
31
32
33
34
35
36
37
38
39
40
 
final ResourceCallbacksAndExecutors cbs = new ResourceCallbacksAndExecutors();

void notifyCallbacksOfResult() {
ResourceCallbacksAndExecutors copy;
Key localKey;
EngineResource<?> localResource;
synchronized (this) {
......

//重点关注cbs的类型
//查找cbs里面的类型
copy = cbs.copy();
.....
}
.....
}

ResourceCallbacksAndExecutors copy() {
return new ResourceCallbacksAndExecutors(new ArrayList<>(callbacksAndExecutors));
}


//cbs赋值的地方
synchronized void addCallback(final ResourceCallback cb, Executor callbackExecutor) {
stateVerifier.throwIfRecycled();
//此时的cb为singleRequest类型,其实现了ResourceCallback接口
//callbackExecutor就是绑定了主线程Handler的线程池
//cbs的类型为ResourceCallbacksAndExecutors
//add的内部实现就是创建ResourceCallbacksAndExecutor并将cb,callbackExecutor赋值到其成员变量
//然后再add到cbs中
cbs.add(cb, callbackExecutor);
......

}


void add(ResourceCallback cb, Executor executor) {
callbacksAndExecutors.add(new ResourceCallbackAndExecutor(cb, executor));
}

让我们看看copy赋值调用的地方,就是调用了ResourceCallbacksAndExecutors类型的cbs的copy方法,copy其实就是创建了ResourceCallbacksAndExecutor集合,这个集合其实就是cbs,我们还需要找到cbs赋值的地方,找半天后你会发现在addCallback方法中会找到cbs的add方法,add方法的内部实现其实就是创建ResourceCallbacksAndExecutor并将cb,callbackExecutor赋值到其成员变量中,所以我们还得确定add方法的两个参数是什么?不知道你是否还有印象,当初在构建任务时我们有专门提到过这个addCallback方法,让我们重新看看Engine的load方法。

Engine#load

1
2
3
4
5
6
7
8
   ....
//调用addCallback()注册了一个ResourceCallback
//这里的cb是load方法的倒数第二个参数,load是在singleRequest的onSizeReady()调用的
//查看后cb为singleRequest类型
//重新看回EngineJob的addCallback方法
engineJob.addCallback(cb, callbackExecutor);
//在子线程中执行DecodeJob的run方法
engineJob.start(decodeJob);

要想确定cb和callbackExecutor的类型,我们还需要一步一步往回走

1
2
3
4
5
6
7
8
9
10
11
12
13
14
15
16
17
18
19
20
21
//特别关注最后两个参数
public synchronized <R> LoadStatus load(
GlideContext glideContext,
Object model,
Key signature,
int width,
int height,
Class<?> resourceClass,
Class<R> transcodeClass,
Priority priority,
DiskCacheStrategy diskCacheStrategy,
Map<Class<?>, Transformation<?>> transformations,
boolean isTransformationRequired,
boolean isScaleOnlyOrNoTransform,
Options options,
boolean isMemoryCacheable,
boolean useUnlimitedSourceExecutorPool,
boolean useAnimationPool,
boolean onlyRetrieveFromCache,
ResourceCallback cb,
Executor callbackExecutor)

SingleRequest#onSizeReady

1
2
3
4
5
6
7
8
9
10
11
12
13
14
15
16
17
18
19
20
21
22
23
loadStatus =
//重点关注倒数第二个参数,传入的是this,即SingleRequest对象,其实现了ResourceCallback接口
//重点关注倒数第一个参数,传入有绑定主线程的Handle的r线程池callbackExectuter
engine.load(
glideContext,
model,
requestOptions.getSignature(),
this.width,
this.height,
requestOptions.getResourceClass(),
transcodeClass,
priority,
requestOptions.getDiskCacheStrategy(),
requestOptions.getTransformations(),
requestOptions.isTransformationRequired(),
requestOptions.isScaleOnlyOrNoTransform(),
requestOptions.getOptions(),
requestOptions.isMemoryCacheable(),
requestOptions.getUseUnlimitedSourceGeneratorsPool(),
requestOptions.getUseAnimationPool(),
requestOptions.getOnlyRetrieveFromCache(),
this,
callbackExecutor);

SingleRequest的onSizeReady中我们确定了cb的类型为SingleRequest对象,另外一个参数的话由于篇幅原因就不一一贴出代码了(都是上文贴过的代码),你可以直接从onSizeReady方法往回看,上面的注释也会提到,最后你会发现这个callbackExecutor其实就是我们一开始提到的含有绑定主线程Handler的线程池。让我们回到最初的地方

EngineJob#onResourceReady

1
2
3
4
5
6
for (final ResourceCallbackAndExecutor entry : copy) {
//回调给ImageViewTarget来展示资源
//entry.cb为singleRequest类型类型
//entry.executor就是含有绑定了主线程的Handler的线程池,即MAIN_THREAD_EXECUTOR
entry.executor.execute(new CallResourceReady(entry.cb));
}

所以我们来看看Executors的mainThreadExecutor方法(忘记的重新看上面的2.2)

1
2
3
4
5
6
7
8
9
10
11
12
13
14
private static final Executor MAIN_THREAD_EXECUTOR =
new Executor() {
//绑定主线程的Looper
private final Handler handler = new Handler(Looper.getMainLooper());

@Override
public void execute(@NonNull Runnable command) {
handler.post(command);
}
};

public static Executor mainThreadExecutor() {
return MAIN_THREAD_EXECUTOR;
}

根据Handler机制的相关知识,当调用MAIN_THREAD_EXECUTOR的execute方法后将会在主线程中执行CallResourceReady对象的run方法。所以我们看看CallResourceReady的run方法

2.6.3 显示图片

EngineJob.CallResourceReady#run

1
2
3
4
5
6
7
8
9
10
11
12
13
14
15
16
17
18
19
20
21
22
23
  public void run() {
synchronized (EngineJob.this) {
if (cbs.contains(cb)) {
// Acquire for this particular callback.
engineResource.acquire();
//重点关注,此时cb为SingleRequest对象
callCallbackOnResourceReady(cb);
removeCallback(cb);
}
decrementPendingCallbacks();
}
}
}

synchronized void callCallbackOnResourceReady(ResourceCallback cb) {
try {
//回调,将目标数据回调出去
//此时的cb为singleRequest类型
cb.onResourceReady(engineResource, dataSource);
} catch (Throwable t) {
throw new CallbackException(t);
}
}

看到这是不是很开心(实际头皮发麻)!又来到了我们熟悉的回调了,此时的cb是SingleRequest类型,我们已经在上文分析过了。所以会调用SingleRequest的onResourceReady方法

SingleRequest#onResourceReady

1
2
3
4
5
6
7
8
9
10
11
12
13
14
15
16
17
18
19
20
21
22
23
24
25
26
27
28
29
30
31
32
33
34
35
36
37
38
39
40
41
42
43
44
45
46
public synchronized void onResourceReady(Resource<?> resource, DataSource dataSource) {
.......
//重点关注
onResourceReady((Resource<R>) resource, (R) received, dataSource);
}

private synchronized void onResourceReady(Resource<R> resource, R result, DataSource dataSource) {
//第一次加载
boolean isFirstResource = isFirstReadyResource();
status = Status.COMPLETE;
this.resource = resource;

if (glideContext.getLogLevel() <= Log.DEBUG) {
Log.d(GLIDE_TAG, "Finished loading " + result.getClass().getSimpleName() + " from "
+ dataSource + " for " + model + " with size [" + width + "x" + height + "] in "
+ LogTime.getElapsedMillis(startTime) + " ms");
}

isCallingCallbacks = true;
try {
boolean anyListenerHandledUpdatingTarget = false;
//如果在使用时设置listener的话,就会回调其中的onResourceReady
if (requestListeners != null) {
for (RequestListener<R> listener : requestListeners) {
anyListenerHandledUpdatingTarget |=
listener.onResourceReady(result, model, target, dataSource, isFirstResource);
}
}
anyListenerHandledUpdatingTarget |=
targetListener != null
&& targetListener.onResourceReady(result, model, target, dataSource, isFirstResource);

if (!anyListenerHandledUpdatingTarget) {
Transition<? super R> animation =
animationFactory.build(dataSource, isFirstResource);

//展示照片
//此时的target为DrawableImageViewTarget
target.onResourceReady(result, animation);
}
} finally {
isCallingCallbacks = false;
}
//通知加载成功
notifyLoadSuccess();
}

这里我们只需要关注target.onResourceReady(result, animation)这句代码,target对象为DrawableImageViewTarget,所以会调用DrawableImageViewTarget的onResourceReady方法,但是因为DrawableImageViewTarget是没有onResourceReady这个方法的,所以应该是在其父类ImageViewTarget中

ImageViewTarget

1
2
3
4
5
6
7
8
9
10
11
12
13
14
15
16
17
18
19
public void onResourceReady(@NonNull Z resource, @Nullable Transition<? super Z> transition) {
//是否有动画效果
if (transition == null || !transition.transition(resource, this)) {
//重点关注,静态图
setResourceInternal(resource);
} else {
//gif
maybeUpdateAnimatable(resource);
}
}

private void setResourceInternal(@Nullable Z resource) {
//调用setResource来展示照片
setResource(resource);
maybeUpdateAnimatable(resource);
}

//此方法为抽象方法,由子类实现,由于分析的是静态图,故实现的子类应该为DrawableImageViewTarget
protected abstract void setResource(@Nullable Z resource);

这里我们以正常的静态图为例子,所以接下来会调用setResourceInternal(resource)方法,然后继续调用setResource(resource)方法来展示图片,setResource在ImageViewTarget为抽象方法,所以我们继续看回子类DrawableImageViewTarget的实现

DrawableImageViewTarget#setResource

1
2
3
4
protected void setResource(@Nullable Drawable resource) {
//成功展示照片
view.setImageDrawable(resource);
}

哇!看到这里眼泪估计又要流下来了,没错setResource很简单,就是直接将照片显示出来!

3. 小结

into方法算的上是整个Glide图片加载流程中逻辑最复杂的一部曲了,代码量多,相对应的工作量也是超级多的,既当爹又当妈,既要网络获取数据,又要解析并显示数据。整理后其主要工作如下图:

总结

Glide源码阅读还是花了很长时间,首先阅读了几篇Glide3.x版本的文章和Glide3.7的源码,然后又阅读了Glide4.9的文章和源码,最后再自己总结。阅读完Glide4.9加载流程的源码给我的感受就是这回调是真的多,而且找回调的参数还挺费时间的。不过整体而言,内心只有一句话,“Glide牛逼!”,用起来只有一行代码,实际内部处理逻辑是多么的复杂以及到位,也足以见得Glide的功能有多强大了。

参考博客:

-------------本文结束感谢您的阅读-------------