Android之Handler机制

注:下列所涉及的源码均基于8.0

1. 背景

经历过开发的我们应该都知道当有耗时操作,比如网络请求等的时候要开启线程,在子线程中进行耗时操作,然后耗时操作完后返回到主线程进行UI更新操作。这时候你可能会有疑问了,为什么不能再子线程中操作UI呢?其实这是因为Android的UI控件并不是线程安全的,这就意味着如果子线程能够操作UI的话,就很可能出现多线程并发操作UI导致UI控件出现各种未知的错误。所以Android系统采用了单线程模型处理UI操作,即UI操作只能在主线程进行,其它线程操作UI时,将会抛出异常。但是在实际开发中,我们总会经常碰到子线程处理耗时操作后更新UI的情况,这时候Android的消息机制(Handler机制)就派上用场了!

2. 作用

在多线程场景中,将工作线程中需要更新UI操作的消息传递到主线程,从而实现工作线程对UI的更新处理,最终实现异步消息的处理。

3. 储备知识

3.1 相关概念

概念 定义 作用
主线程(ActivityThread) 当程序第一次启动时,会同时自动开启主线程 处理UI操作
ThreadLocal 线程内部的存储类,各个线程对ThreadLocal的读写操作互不干扰 存储当前线程的Looper对象,提供set和get方法来存储以及获取
Message(消息) 一般情况下有三种参数:
Message.what:int类型,用于标识
Message.arg1:int类型,消息内容
Message.arg2:int类型,消息内容
Message.obj:Object类型,消息内容
存储更新UI操作信息
MessageQueue(消息队列) 一种以队列形式对外提供插入和删除操作的
单链表数据结构
存储Handler发送过来的消息
Looper(循环器) Handler与MessageQueue的通信媒介 循环取出消息队列的消息,并将取出的消息分发给Handler
Handler(处理者) 主线程与子线程的通信媒介,线程信息的主要处理者 发送消息到消息队列,并处理Looper分发过来的消息

3.2 使用方式

要想分析Handle机制,就必须得先知道Handler是怎么使用的。根据Handler发送消息到消息队列的不同而主要分为两种使用方式:

  • Handler.sendMessage
  • Handler.post

接下来让我们来瞧瞧两种的具体使用方法

1 .sendMessage

在该方法中又可以分为2种:

  • 新建Handler子类(内部类)
  • 匿名内部类

废话不多说直接上代码:

新建Handler子类

1
2
3
4
5
6
7
8
9
10
11
12
13
14
15
16
17
18
19
20
21
22
23
//自定义Handler子类
class SonHandler extends Handler {
// 重写handleMessage方法
@Override
public void handleMessage(Message msg) {
...// 接受到消息后的UI操作
}
}

//在主线程中创建Handler子类实例
private Handler mhandler = new SonHandler();
//工作线程中发送消息
new Thread() {
@Override
public void run() {
// 定义要发送的消息
Message msg = Message.obtain();
msg.what = 1; //消息的标识
msg.obj = "新建子类"; // 消息的存放
// b. 通过Handler发送消息到消息队列
mHandler.sendMessage(msg);
}
}.start();

匿名内部类。在平时开发中,这种写法占多数,但需注意的是很可能会出现内存泄漏

1
2
3
4
5
6
7
8
9
10
11
12
13
14
15
16
17
18
19
20
21
//匿名创建Handler对象并重写handleMessage方法
private Handler mhandler = new Handler(){
@Override
public void handleMessage(Message msg) {
...// 需执行的UI操作
}
};

.......
//工作线程中发送消息
new Thread() {
@Override
public void run() {
// 定义要发送的消息
Message msg = Message.obtain();
msg.what = 1; //消息的标识
msg.obj = "新建子类"; // 消息的存放
// b. 通过Handler发送消息到消息队列
mHandler.sendMessage(msg);
}
}.start();

2 .post

这个方法在日常开发中也用的比较多,比如一个引导页推迟几秒的实现,但是需要注意是否出现内存泄漏问题

1
2
3
4
5
6
7
8
9
10
11
//在主线程中创建Handler实例
private Handler mhandler = new Handler();

// 在工作线程中 发送消息到消息队列中(需传入1个Runnable对象)
mHandler.post(new Runnable() {
@Override
public void run() {
... // 需执行的UI操作
}

});

4. Handler机制分析

4.1 工作流程图

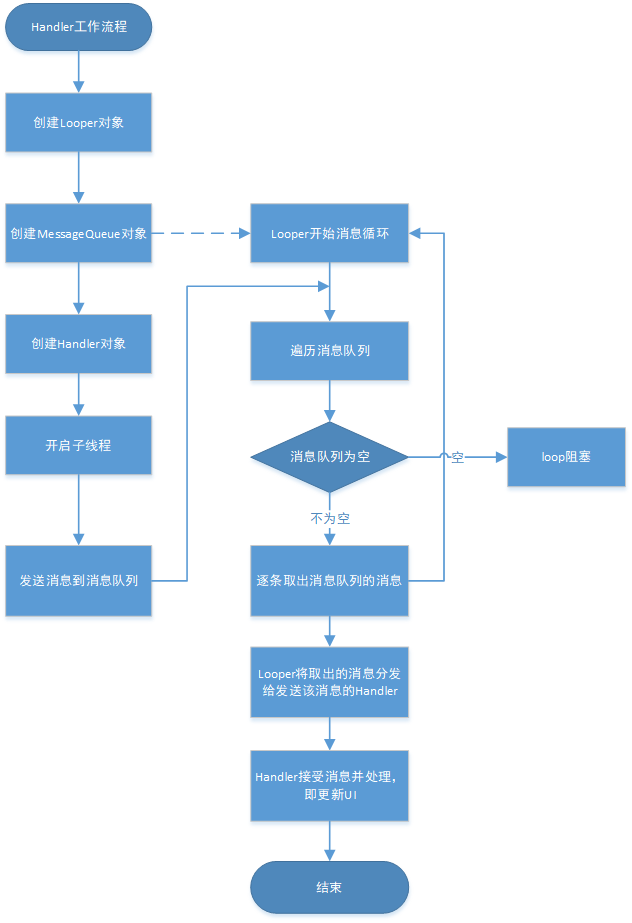
在分析Handler机制前,我们首先看看Handler的工作流程图:

1564662704961

4.2 重要相关类

从Hanldler的工作流程图我们可以发现其中有重要的三个类,分别是:

  • Handler
  • MessageQueue
  • Looper

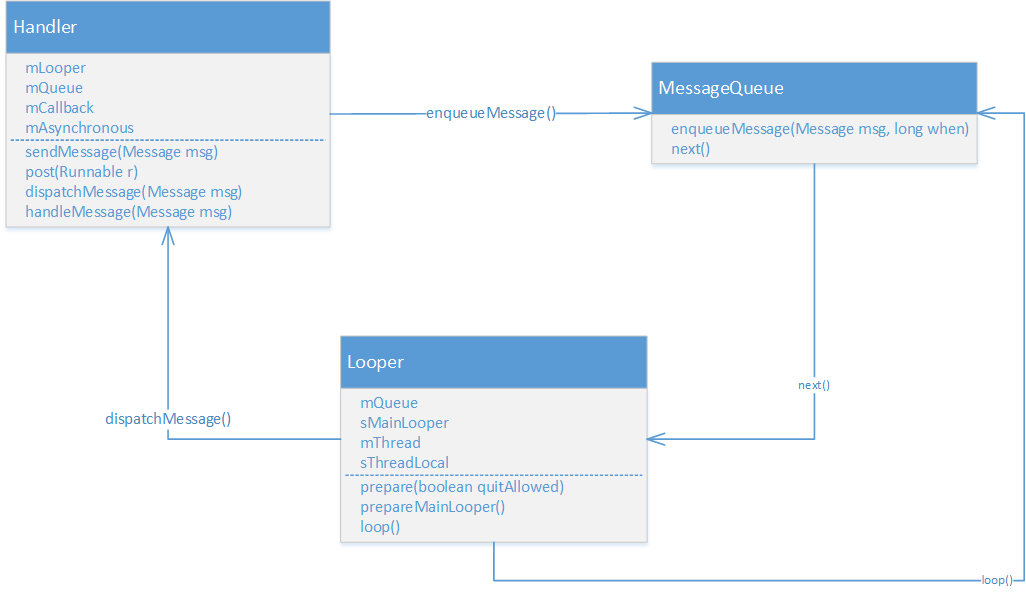
Hander的运行需要MessageQueue和Looper的支撑。Handler发送消息时通过调用MessageQueue的enqueueMessage()方法来将消息插入到消息队列,然后循环器Looper通过loop方法不断的调用MessageQueue的next方法来从消息队列中取出消息,然后将取出的消息通过Handler的dispatchMessage方法分发给Handle去处理。如下图所示:

1564585612067

4.3 源码分析

从上面的储备知识我们知道Handler的使用方法有两种,所以下面的源码分析将根据Handler的工作流程图对两种方法分别分析:

1. sendMessage

我们知道sendMessage方式又分为了新建子类继承Handler和匿名内部类两种,这里以比较常见的匿名内部类的使用方式为例子

步骤1:创建Handler对象

首先我们在主线程中通过匿名内部类的方式创建了Handler对象。

1
2
3
4
5
6
private Handler mhandler = new  Handler(){
@Override
public void handleMessage(Message msg) {

}
};

让我们来看看Handler的构造方法

1
2
3
4
5
6
7
8
9
10
11
12
13
14
15
16
17
18
19
20
21
22
23
24
25
26
27
28
29
30
31
32
public Handler() {
this(null, false);
}
public Handler(Callback callback) {
this(callback, false);
}

public Handler(Looper looper) {
this(looper, null, false);
}

public Handler(Looper looper, Callback callback) {
this(looper, callback, false);
}

@UnsupportedAppUsage
public Handler(boolean async) {
this(null, async);
}

public Handler(Callback callback, boolean async) {
.....
}


@UnsupportedAppUsage
public Handler(Looper looper, Callback callback, boolean async) {
mLooper = looper;
mQueue = looper.mQueue;
mCallback = callback;
mAsynchronous = async;
}

可以发现Handler中有7个构造方法,但是别慌,我们只看通过匿名内部类构造对象时相关的构造方法。

源码:Handler.java

1
2
3
4
5
6
7
8
9
10
11
12
13
14
15
16
17
18
19
20
  public Handler() {
this(null, false);
}
public Handler(Callback callback, boolean async) {
....
//1.指定Looper对象,从ThreadLocal获取当前线程的Looper对象
mLooper = Looper.myLooper();
//当前线程没有Looper,则抛出异常
//注:1.若需要在子线程中创建Handler对象,则需创建Looper对象,否则无法创建Hander对象
//2.可通过Looper.getMainLooper获取到主线程的rooper对象
if (mLooper == null) {
throw new RuntimeException(
"Can't create handler inside thread " + Thread.currentThread()
+ " that has not called Looper.prepare()");
}
//2.绑定消息队列对象(MessageQueue)
mQueue = mLooper.mQueue;
mCallback = callback;
mAsynchronous = async;
}

可以发现在创建Handler对象时,会进行Looper与MessageQueue等的绑定,在指定Looper对象时,调用了Looper的myLooper方法,绑定MessageQueue时,是直接绑定了Looper对象的成员变量mQueue,让我们看看具体实现。

源码:Looper.java

1
2
3
4
5
6
7
8
public static @Nullable Looper myLooper() {
return sThreadLocal.get();
}
//创建一个MessageQueue,然后将当前线程对象保存起来
private Looper(boolean quitAllowed) {
mQueue = new MessageQueue(quitAllowed);
....
}

sThreadLocal是ThreadLocal对象,在Looper里我们发现myLooper方法只是简单的取出了ThreadLocal中的Looper对象,而mQueue赋值则是在Looper的构造方法中,这时候估计你就会有疑问了,使用的时候我们明明什么都没做,只是创建了Handler对象而已,那是在什么时候构造了Looper对象?又是在哪里将Looper对象保存在了sThreadLocal?不急,下面就揭开这个谜题!

创建Handler对象前:创建Looper对象和MessageQueue对象

我们在创建Handler对象时,是在主线程中创建的,而通过上面的相关概念我们知道主线程其实就是ActivityThread,我们都知道主线程的入口为main方法,我们来看看主线程的main方法:

源码:ActivityThread#main

1
2
3
4
5
6
7
8
9
  public static void main(String[] args) {
....
//创建主线程的Looper以及MessageQueue
Looper.prepareMainLooper();
...
//开启主线程的消息循环
Looper.loop();
...
}

在main方法中我们可以找到主线程开启时是会调用Looper的prepareMainLooper方法和loop方法的,那这两个方法有什么作用呢?首先来看看prepareMainLooper()

源码:Looper.java

1
2
3
4
5
6
7
8
9
10
11
12
13
14
15
16
17
18
19
20
21
22
23
24
   /**
* 给主线程即ActivityThread创建Looper使用
* 注:当主线程创建时会自动调用该方法,所以不需手动生成主线程的Looper对象
*
*/
public static void prepareMainLooper() {
prepare(false);
synchronized (Looper.class) {
if (sMainLooper != null) {
throw new IllegalStateException("The main Looper has already been prepared.");
}
sMainLooper = myLooper();
}
}

//该方法不能被调用两次,因为一个线程中只能对应一个Looper对象
private static void prepare(boolean quitAllowed) {
//sThreadLocal为ThreadLocal对象,在这里用于存储当前线程的Looper对象
if (sThreadLocal.get() != null) {
throw new RuntimeException("Only one Looper may be created per thread");
}
//如果是第一次调用Looper.prepare,则创建Looper对象并存放在ThreadLocal中
sThreadLocal.set(new Looper(quitAllowed));
}

其实prepareMainLooper的具体实现是调用perpare来实现的,而prepare方法会创建Looper对象并存放在ThreadLocal中,而Looper构造方法我们上面有提到过,这里再看下:

1
2
3
4
5
//创建一个MessageQueue,然后将当前线程对象保存起来
private Looper(boolean quitAllowed) {
mQueue = new MessageQueue(quitAllowed);
mThread = Thread.currentThread();
}

这样是不是突然恍然大悟,MessageQueue对象和Looper对象都在主线程创建的时候自动创建了,并不需要我们在主线程中手动创建,当在我们在主线程创建Handler时就实现了Looper对象和MessageQueue的绑定。

消息循环

让我们继续回到ActivityThread的main方法,当创建了Looper对象和MessageQueue对象后,即Looper.prepareMainLooper();执行后,我们观察到还会向下继续执行loop方法。

源码:Looper#loop

1
2
3
4
5
6
7
8
9
10
11
12
13
14
15
16
17
18
19
20
21
22
23
24
25
26
27
28
29
30
  /**
* 只有调用该方法后,消息循环系统才会真正的起作用
*/
public static void loop() {
//获取当前Looper的消息队列
final Looper me = myLooper();
if (me == null) {
throw new RuntimeException("No Looper; Looper.prepare() wasn't called on this thread.");
}
//获取当前线程Looper对象的消息队列
final MessageQueue queue = me.mQueue;

....
//死循环,唯一跳出循环的办法就是MessageQueue的next返回了null.即消息队列的消息为空
for (;;) {
//从消息队列中取出消息
Message msg = queue.next(); // next为阻塞操作
if (msg == null) {
// No message indicates that the message queue is quitting.
return;
}
....
try {
//msg.target是发送这条信息的Handler对象,派发消息给这个Hanler对象
msg.target.dispatchMessage(msg);
dispatchEnd = needEndTime ? SystemClock.uptimeMillis() : 0;
}
.....
}
}

我们知道Looper的主要工作就是循环的取出消息然后分发给Handler,这个工作就是通过这个loop方法实现的,在创建Looper对象后,只有调用loop方法,Looper对象才真正的开始工作。在这个方法中首先获取到当前Looper对象的消息队列,然后可以发现代码中有个死循环,唯一跳出循环的方法是取出的消息为null。什么时候取出的消息为null呢?并不是消息队列中没有消息了就为null,而是当Looper的quit被调用时,Looper就会调用MessageQueue的quit或者quitSafely方法通知消息队列退出,当消息队列被标记退出状态时,next就会返回null,即取出的消息为null。来看看MessageQueue的next实现。

源码:MessageQueue#next

1
2
3
4
5
6
7
8
9
10
11
12
13
14
15
16
17
18
19
20
21
22
23
24
25
26
27
28
29
30
31
32
33
34
35
36
37
38
39
40
41
42
43
44
45
46
47
48
49
50
51
52
Message next() {
// Return here if the message loop has already quit and been disposed.
// This can happen if the application tries to restart a looper after quit
// which is not supported.
final long ptr = mPtr;
if (ptr == 0) {
return null;
}

for (;;) {
...
synchronized (this) {
// Try to retrieve the next message. Return if found.
final long now = SystemClock.uptimeMillis();
Message prevMsg = null;
Message msg = mMessages;
if (msg != null && msg.target == null) {
// Stalled by a barrier. Find the next asynchronous message in the queue.
do {
prevMsg = msg;
msg = msg.next;
} while (msg != null && !msg.isAsynchronous());
}
if (msg != null) {
if (now < msg.when) {
// Next message is not ready. Set a timeout to wake up when it is ready.
nextPollTimeoutMillis = (int) Math.min(msg.when - now, Integer.MAX_VALUE);
} else {
// Got a message.
mBlocked = false;
if (prevMsg != null) {
prevMsg.next = msg.next;
} else {
mMessages = msg.next;
}
msg.next = null;
if (DEBUG) Log.v(TAG, "Returning message: " + msg);
msg.markInUse();
return msg;
}
}
.....
//标记退出
if (mQuitting) {
dispose();
return null;
}
}

.....
}
}

可以发现next方法也是死循环,这就意味着next是个阻塞操作,当没有消息时,next方法会一直阻塞那里,而调用next方法来取消息的loop方法自然也会阻塞在那里。

让我们回到loop方法,当MessageQueue的next返回了新消息后,Looper就会分发这条消息,具体怎么分发呢?通过调用msg.target.dispatchMessage(msg),而这个msg.target为发送这条消息的Handler对象。这样Handler发送的消息最终又交给它的dispatchMessage来处理。(dispatchMessage下面会分析)

由于我们这时候我们只是创建了Hander对象,所以这时消息循环开始后是没有消息的,此时Looper处于待唤醒状态,需要子线程发送消息后才被唤醒。

步骤2:在子线程中创建消息对象并发送

1
2
3
4
5
6
7
8
9
10
11
12
//工作线程中发送消息
new Thread() {
@Override
public void run() {
// 定义要发送的消息
Message msg = Message.obtain();
msg.what = 1; //消息的标识
msg.obj = "新建子类"; // 消息的存放
// b. 通过Handler发送消息到消息队列
mHandler.sendMessage(msg);
}
}.start();

在这里我们使用了实现Runnable的方法开启了子线程,并且在子线程定义了消息对象,然后通过Handler对象的sendMessage方法将消息发送到消息队列中,来看看sendMessage方法

源码:Handler.java

1
2
3
4
5
6
7
8
9
10
11
12
13
14
15
16
17
18
19
20
21
22
23
24
25
26
27
28
29
30
31
32
33
34
public final boolean sendMessage(Message msg)
{
return sendMessageDelayed(msg, 0);
}

public final boolean sendMessageDelayed(Message msg, long delayMillis)
{
if (delayMillis < 0) {
delayMillis = 0;
}
return sendMessageAtTime(msg, SystemClock.uptimeMillis() + delayMillis);
}

public boolean sendMessageAtTime(Message msg, long uptimeMillis) {
//获取当前Handler绑定的消息队列
MessageQueue queue = mQueue;
if (queue == null) {
RuntimeException e = new RuntimeException(
this + " sendMessageAtTime() called with no mQueue");
Log.w("Looper", e.getMessage(), e);
return false;
}
return enqueueMessage(queue, msg, uptimeMillis);
}

private boolean enqueueMessage(MessageQueue queue, Message msg, long uptimeMillis) {
//把当前Handler实例对象作为msg的target属性
msg.target = this;
if (mAsynchronous) {
msg.setAsynchronous(true);
}
//调用消息对象的enqueueMessage
return queue.enqueueMessage(msg, uptimeMillis);
}

可以发现当调用sendMessage方法发送消息时,会调用Handler里面的一系列方法,在这些方法中会获取到当前Handler绑定的消息队列,然后调用这个消息队列的enqueueMessage方法来向消息队列插入一条消息。值得一说的是在调用消息队列的enqueueMessage方法之前会将当前Handler对象赋值给msg的target属性,这也证明了上面讲到的loop()中msg.traget所代表的含义。让我们瞧瞧消息队列的插入是怎么实现的

源码:MessageQueue#enqueueMessage

1
2
3
4
5
6
7
8
9
10
11
12
13
14
15
16
17
18
19
20
21
22
23
24
25
26
27
28
29
30
31
32
33
34
35
36
37
38
39
40
41
 boolean enqueueMessage(Message msg, long when) {
synchronized (this) {
...
msg.markInUse();
msg.when = when;
Message p = mMessages;
boolean needWake;
//判断消息队列有无消息
if (p == null || when == 0 || when < p.when) {
// 若无,则将插入的消息作为队头,如果消息队列处于等待状态,则唤醒
msg.next = p;
mMessages = msg;
needWake = mBlocked;
} else {
// Inserted within the middle of the queue. Usually we don't have to wake
// up the event queue unless there is a barrier at the head of the queue
// and the message is the earliest asynchronous message in the queue.
needWake = mBlocked && p.target == null && msg.isAsynchronous();
Message prev;
//消息队列有消息,则根据消息创建的时间插入到队列中
for (;;) {
prev = p;
p = p.next;
if (p == null || when < p.when) {
break;
}
if (needWake && p.isAsynchronous()) {
needWake = false;
}
}
msg.next = p; // invariant: p == prev.next
prev.next = msg;
}

// We can assume mPtr != 0 because mQuitting is false.
if (needWake) {
nativeWake(mPtr);
}
}
return true;
}

从代码中可以发现该方法主要操作为单链表的插入操作,在插入前判断是否要唤醒当前消息队列,而上面我们提到当没有消息时loop会阻塞,进入到待唤醒状态,所以当有消息时loop也会被唤醒。

步骤3:回到主线程处理消息

既然在子线程我们成功的将消息发送到消息队列中,并唤醒了loop进行消息循环,从上面对Looper的loop方法的分析我们知道在loop中获取到消息队列的消息时,将会执行msg.target.dispatchMessage(msg),即执行发送消息的Handler对象的dispatchMessage方法,让我们来瞧瞧这个方法:

源码:Handler#dispatchMessage

1
2
3
4
5
6
7
8
9
10
11
12
13
14
15
16
17
18
19
 /**
* Handle system messages here.
* 该方法是在创建Handler时所使用的Looper执行的
*/
public void dispatchMessage(Message msg) {
//检查Message的callback是否为null,这里的callback为Runnable对象
if (msg.callback != null) {
handleCallback(msg);
} else {
//检查mCallback是否为null,mCallback为匿名内部类使用Handler的方式
if (mCallback != null) {
if (mCallback.handleMessage(msg)) {
return;
}
}
//派生Handler的子类并重写其handleMessage方法来处理消息
handleMessage(msg);
}
}

该方法的主要逻辑是:对Hanler使用方式的判断,然后做相应的处理。首先检查Message的callback是否为null,这里的callback为Runnable对象,即判断是否为post方式发送消息的,不是则为sendMessage方式发送消息。如果是sendMessage方式还得检查Handler对象的创建方式,如果是匿名内部类,则mCallback!=null,反之,mCallback等于null.

处理逻辑流程图如下:

1564659522419

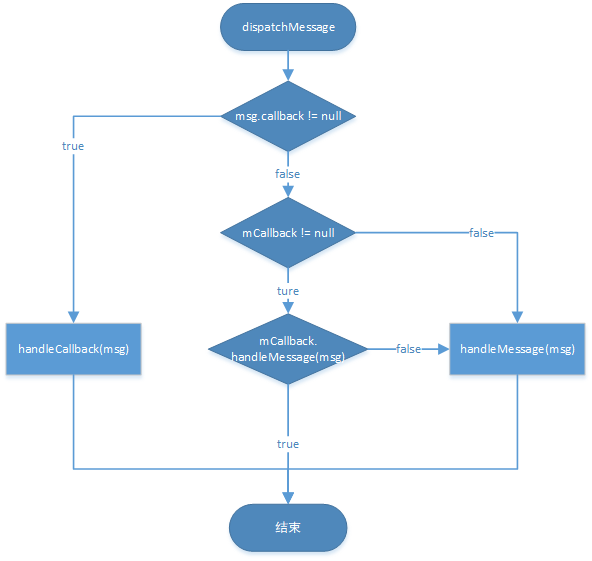
在这里也可以验证使用Hanler的方式大体上可以分为两种的。由于这里我们使用的是sendMessage方式,并且通过匿名内部类的方法创建Handler对象,所以会执行mCallback.handleMessage(msg)方法。而mCallback其实就是个回调接口,如下所示:

1
2
3
public interface Callback {
public boolean handleMessage(Message msg);
}

所以当dispatchMessage执行后会回调当初我们在匿名内部类中重写的handleMessage方法,即回到主线程操作UI。

1
2
3
4
5
6
private Handler mhandler = new  Handler(){
@Override
public void handleMessage(Message msg) {
//UI操作
}
};

而如果是使用新建内部类继承Handler的方式来创建Handler对象时,其它步骤都是一样的,只是在这里的时候通过源码分析可以知道将会调用handleMessage方法,来看看Handler的handleMessage方法是怎样的:

1
2
   //空实现,需要重写
public void handleMessage(Message msg) {}

可以发现其实在Handler里handleMessage的方法是空实现,所以在新建内部类继承Handler的方式创建Handler对象时,应该在内部类中重写handleMessage,这时候当Handler对象收到Looper分发的消息时,就会执行handleMessage来进行相关UI操作。

1
2
3
4
5
6
7
8
//自定义Handler子类
class SonHandler extends Handler {
// 重写handleMessage方法
@Override
public void handleMessage(Message msg) {
...// 接受到消息后的UI操作
}
}

到此,sendMessage的两种方式我们都通过源码分析了一遍。

2. post

通过上面对sendMessage方式的分析,其实post方法发送消息大致流程跟sendMessage大致上是一样的,不同的只是Handler发送消息和处理Looper分发的消息有所不同,接下来主要分析这两个不同之处,其它相同之处就不再啰嗦了。

不同之处1:发送消息

1
2
3
4
5
6
7
8
// 在工作线程中 发送消息到消息队列中(需传入1个Runnable对象)
mHandler.post(new Runnable() {
@Override
public void run() {
... // 需执行的UI操作
}

});

通过上面的使用方式我们知道,该方式通过post来发送消息,并且没有定义Message就可以直接在run中执行更新UI的操作,真的这么神奇吗?让我们来通过源码来一探究竟!

源码:Handler#post

1
2
3
4
public final boolean post(Runnable r)
{
return sendMessageDelayed(getPostMessage(r), 0);
}

Handler的post方法其实也是调用sendMessageDelayed方法来实现的,这跟sendMessage方法是一样的。只不过在sendMessage中直接传入了Message对象,而在post方法中传入的是一个通过getPostMessage方法得到的Message对象,让我们来看看getPostMessage

源码:Handler#getPostMessage

1
2
3
4
5
6
7
  private static Message getPostMessage(Runnable r) {
//创建1个消息对象
Message m = Message.obtain();
//将Runnable对象赋值给message的callback属性
m.callback = r;
return m;
}

欸!看上面代码是不是感觉到有一丢丢熟悉呢?没错,这个方法其实就是用来创建消息对象,并且将Runnable对象赋值给了消息对象的callback属性。有了Message对象后,接下去的流程就与sendMessage一致。

不同之处2:处理消息

其实上面我们已经提到过dispatchMessage的使用了,为了方便说明,这里还是贴出dispatchMessage方法。

Handler#dispatchMessage

1
2
3
4
5
6
7
8
9
10
11
12
13
14
15
16
17
18
19
 /**
* Handle system messages here.
* 该方法是在创建Handler时所使用的Looper执行的
*/
public void dispatchMessage(Message msg) {
//检查Message的callback是否为null,这里的callback为Runnable对象
if (msg.callback != null) {
handleCallback(msg);
} else {
//检查mCallback是否为null,mCallback为匿名内部类使用Handler的方式
if (mCallback != null) {
if (mCallback.handleMessage(msg)) {
return;
}
}
//派生Handler的子类并重写其handleMessage方法来处理消息
handleMessage(msg);
}
}

当Handler收到Looper分发的消息后,此时msg.callback肯定不为null,因为在上面的发送消息时我们将Runnable对象传进去了,所以会执行handleCallback方法,而这个方法也很简单,就是回调了Runnable的run方法。

1
2
3
private static void handleCallback(Message message) {
message.callback.run();
}

于是我们就能在重写的run方法中执行UI操作。

1
2
3
4
5
6
7
mHandler.post(new Runnable() {
@Override
public void run() {
... // 需执行的UI操作
}

});

从上面我们也明白了使用Handler.post的工作流程与Handler.sendMessage方式基本类似,主要不同在于:

  • 不需外部创建消息对象,而是内部根据传入的Runnable对象 封装消息对象
  • 回调的消息处理方法是:重写Runnable对象的run

至此关于Handler.post的源码解析结束。

思考

在通过源码分析完Handler机制后,发现了值得一提的问题。

当在主线程创建Handler对象时,Looper的消息循环也开始执行,这时候的loop方法由于消息队列中没有消息可以获取到,将出现阻塞,那么主线程为什么不会出现阻塞呢?

答:阻塞是有的,但是不会卡住 。主要原因有2个:

  1. epoll模型 。当没有消息的时候会epoll.wait,等待句柄写的时候再唤醒,这个时候其实是阻塞的。

  2. 所有的ui操作都通过handler来发消息操作。 比如子线程发送消息或者各种点击事件,这时候就会有句柄写操作,从而唤醒上文的wait操作,所以不会被卡死了。

参考博客:Android中为什么主线程不会因为Looper.loop方法造成阻塞

由思考得出的结论:

  • ActivityThread的main方法主要就是做消息循环,一旦退出消息循环,那程序也就可以退出了。
  • 主线程的Looper.loop()中死循环本身不会对Activity产生ANR,除非其消息事件本身的处理存在耗时操作,才会产生ANR

这么一来,对Handler机制的分析也就告一段落了!

-------------本文结束感谢您的阅读-------------