View的工作原理

文章中出现的源码均基于9.0

1. 知识储备

1.1 ViewGroup.LayoutParams

作用: 指定View的高度(height)和宽度(width)等布局参数,用来子视图向父视图传达自己意愿的一个东西

具体使用

参数 说明
fill_parent 强制性使子视图的大小扩展到父视图大小相等(不含padding),现在几乎不怎么使用
match_parent 与fill_parent相同,用于Android2.3以后的版本
wrap_content 自适应大小,强制性使视图扩展以便显示出全部内容(含padding)
具体值 直接设置具体的数值,单位一般为dp

例子:xml中使用

1
2
3
4
android:layout_width="wrap_content"   //自适应大小  
android:layout_width="match_parent" //与父视图等宽
android:layout_width="fill_parent" //与父视图等宽
android:layout_width="10dp" //设置宽度值为10dp

子类

  • ViewGroup.MarginLayoutParams:只能设置childView的margin属性信息
  • LinearLayout.LayoutParams:由于继承了ViewGroup.MarginLayoutParams,所以可以支持动态设置高度、宽度、以及margin属性,另外它还有自己特有属性:gravity和weight属性。
  • RelativeLayout.Params:
  • ……

1.2 MeasureSpec

1.定义

字面翻译过来,就是测量规格类,可以理解为测量View大小的依据。MeasureSpec在很大程度上决定了一个View的大小。

2.组成

MeasureSpec:测量规格,代表的是一个32位的int值。MeasureSpec=SpecMode+SpecSize,通过使用二进制,可以将测量模式与大小打包成一个int值,并提供了打包和解包的方法:

  • makeMeasureSpec(int mode,int size):根据测量模式和测量大小打包成一个MeasureSpec
  • getMode(int measureSpec):根据MeasureSpec来得到SpecMode
  • getSize(int measureSpec):根据MeasureSpec来得到SpecSize

SpecMode:测量模式,占MeasureSpec的高2位。测量模式的类型有3种:

  • UNSPECIFIED:父容器不对View有任何限制,一般用于系统内部,表示一种测量的状态
  • EXACTLY:父视图为子视图指定一个确切的尺寸,子视图大小必须在该指定尺寸内。对应了LayoutParams中的match_parent和具体数值这两种模式
  • AT_MOST:父容器指定了一个可用大小即SpecSize,View的大小不能大于这个值。它对应了LayoutParams中的wrap_content

SpecSize:测量大小,占measureSpec的低30位

3.MeasureSpec值的计算

对于DecorVeiw和普通View来说,MeasureSpec的计算稍微有点区别。

  • Decor View:MeasureSpec由窗口尺寸和自身的LayoutParams来共同确定
  • 普通View:子View的LayoutParams和父容器的MeasureSpec共同确定

然后我们从源码来验证普通View的MeasureSpec的计算,先来看看View中getChildMeasureSpec的源码:

1
2
3
4
5
6
7
8
9
10
11
12
13
14
15
16
17
18
19
20
21
22
23
24
25
26
27
28
29
30
31
32
33
34
35
36
37
38
39
40
41
42
43
44
45
46
47
48
49
50
51
52
53
54
55
56
57
58
59
60
61
62
63
64
65
66
67
68
69
70
71
72
73
74
75
76
77
78
79
80
81
82
  /**
* 得到子元素的MeasureSpec
*
* @param spec 父View的MeasureSpec
* @param padding view当前尺寸的内边距和外边距(padding和margin)
* @param childDimension 子视图的布局参数(宽/高)
* @return 子视图的MeasureSpec
*/
public static int getChildMeasureSpec(int spec, int padding, int childDimension) {
int specMode = MeasureSpec.getMode(spec); //父View的测量模式
int specSize = MeasureSpec.getSize(spec); //父View的大小

//父容器剩余空间 = 父大小-边距(子View不一定用到)
int size = Math.max(0, specSize - padding);

//所求的子view的实际模式和实际大小
int resultSize = 0;
int resultMode = 0;

//根据父View的测量模式和子View的LayoutParams确定子View的大小
switch (specMode) {
// Parent has imposed an exact size on us
case MeasureSpec.EXACTLY:
//当子View的LayoutParams>0,即有确定的值
if (childDimension >= 0) {
resultSize = childDimension;
resultMode = MeasureSpec.EXACTLY;
//当子View的LayoutParams为MATCH_PARENT时
} else if (childDimension == LayoutParams.MATCH_PARENT) {
// 子View大小为父View要求的大小,模式为EXACTLY
resultSize = size;
resultMode = MeasureSpec.EXACTLY;
//当子View的LayoutParams为WRAP_CONTENT时
} else if (childDimension == LayoutParams.WRAP_CONTENT) {
//子View自己决定自己的大小,但不能超过父View的大小,模式为WRAP_CONTENT
resultSize = size;
resultMode = MeasureSpec.AT_MOST;
}
break;

//当父view的模式为AT_MOST时,父view强加给子view一个最大的值。(一般是父view设置为wrap_content)
case MeasureSpec.AT_MOST:
if (childDimension >= 0) {
// Child wants a specific size... so be it
resultSize = childDimension;
resultMode = MeasureSpec.EXACTLY;
} else if (childDimension == LayoutParams.MATCH_PARENT) {
// Child wants to be our size, but our size is not fixed.
// Constrain child to not be bigger than us.
resultSize = size;
resultMode = MeasureSpec.AT_MOST;
} else if (childDimension == LayoutParams.WRAP_CONTENT) {
// Child wants to determine its own size. It can't be
// bigger than us.
resultSize = size;
resultMode = MeasureSpec.AT_MOST;
}
break;

// 当父view的模式为UNSPECIFIED时,父容器不对view有任何限制,要多大给多大
// 多见于ListView、GridView
case MeasureSpec.UNSPECIFIED:
if (childDimension >= 0) {
// Child wants a specific size... let him have it
resultSize = childDimension;
resultMode = MeasureSpec.EXACTLY;
} else if (childDimension == LayoutParams.MATCH_PARENT) {
// Child wants to be our size... find out how big it should
// be
resultSize = View.sUseZeroUnspecifiedMeasureSpec ? 0 : size;
resultMode = MeasureSpec.UNSPECIFIED;
} else if (childDimension == LayoutParams.WRAP_CONTENT) {
// Child wants to determine its own size.... find out how
// big it should be
resultSize = View.sUseZeroUnspecifiedMeasureSpec ? 0 : size;
resultMode = MeasureSpec.UNSPECIFIED;
}
break;
}
//noinspection ResourceType
return MeasureSpec.makeMeasureSpec(resultSize, resultMode);
}

上述的源码其实并不难理解,从源码中我们也可以看出子元素的MeasureSpec是由父容器的MeasureSpec和子元素的LayoutParams共同确定的。而具体的创建规则如下(根据源码整理得出):

前提 子View的MeasureMode 子View的MeasureSize
子View采用具体数值 EXACTLY 自身设置的具体数值
子View采用match_parent时 父容器的测量模式 父容器剩余空间
子View采用wrap_content时 AT_MOST 父容器剩余空间

2.View的工作流程

View的工作流程主要是指下面三大流程:

  • measure:测量,确定View的测量宽/高
  • layout:布局,确定View的最终宽/高和四个顶点的位置
  • draw:绘制,将View绘制到屏幕上

那么三大流程的入口在哪呢?

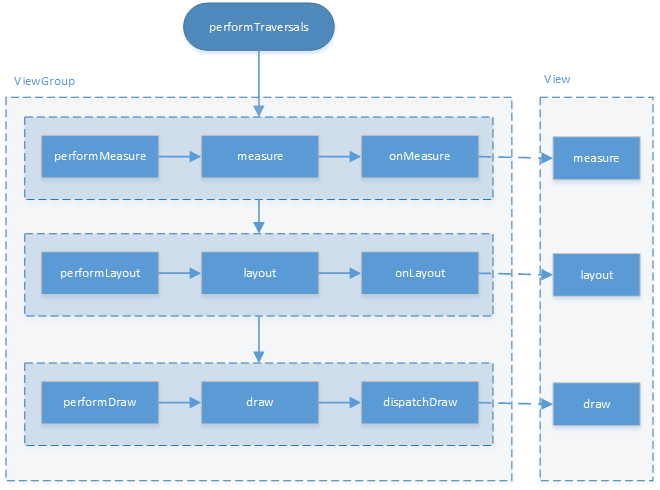
答:View的绘制是从ViewRootImpl类的performTraversals方法开始的,通过阅读performTraversals的源码我们可以知道,在里面会依次调用performMeasure,performLayout,performDraw来分别完成顶级View的measure,layou和draw这三大流程。然后在performMeasure,performLayout,performDraw中又会各自调用measure,layout,draw方法。performTraversals的大致流程如下:

1564463373245

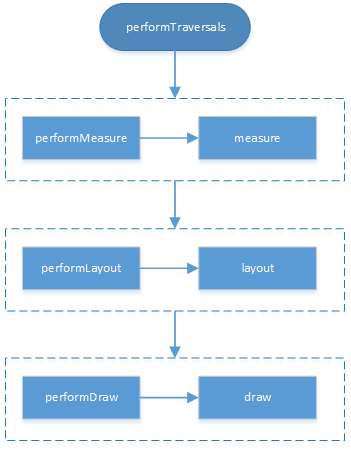
从流程图我们可以看出,三大流程的入口分别是measure(),layout(),draw()方法,那么接下来让我们一步一步的从源码来分析每个流程。

2.1 measure过程

measure过程根据View的类型分为两种情况:

  • 单一View:通过measure过程就完成了其测量过程
  • ViewGroup:除了完成自己的测量过程外,还会遍历调用子元素的measure方法,各个子元素再递归执行该流程。

由于两种情况都涉及到了子元素的measure方法,所以我们首先来分析单一View的measure过程。
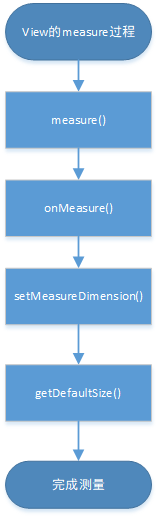
1. 单一View的measure过程

单一View的measure过程从measure方法开始,来看看View的measure方法:

源码:View#measure()

1
2
3
4
5
6
7
8
9
10
11
12
13
14
15
16
17
18
19
20
/**
*
* final类型,子类不能重写此方法
* @param widthMeasureSpec 宽规格
* @param heightMeasureSpec 高规格
*
* @see #onMeasure(int, int)
*/
public final void measure(int widthMeasureSpec, int heightMeasureSpec) {
......
int cacheIndex = forceLayout ? -1 : mMeasureCache.indexOfKey(key);
if (cacheIndex < 0 || sIgnoreMeasureCache) {
// measure ourselves, this should set the measured dimension flag back
onMeasure(widthMeasureSpec, heightMeasureSpec);
mPrivateFlags3 &= ~PFLAG3_MEASURE_NEEDED_BEFORE_LAYOUT;
} else {
.....
}

}

从上面源码我们可以发现measure方法是一个final类型的方法,这就意味着子类不能重写此方法,另外在这个方法中我们还能发现会调用onMeasure方法,因此来看看onMeasure方法的实现:

1
2
3
4
5
6
7
8
9
10
/**  
* 根据View宽/高的测量规格计算View的宽/高值:getDefaultSize()
* 设置测量后的View宽 / 高:setMeasuredDimension()
* @param widthMeasureSpec View的宽规格
* @param heightMeasureSpec View的高规格
*/
protected void onMeasure(int widthMeasureSpec, int heightMeasureSpec) {
setMeasuredDimension(getDefaultSize(getSuggestedMinimumWidth(), widthMeasureSpec),
getDefaultSize(getSuggestedMinimumHeight(), heightMeasureSpec));
}

这个方法很简单,setMeasuredDimension方法会设置View的测量值,重点看getDefaultSize这个方法:

1
2
3
4
5
6
7
8
9
10
11
12
13
14
15
16
17
18
19
20
21
22
23
24
  /**
* 根据View的宽/高的测量规格计算View的宽/高值。
*
* @param size 默认大小
* @param measureSpec 宽/高的测量规格
* @return View的宽/高值
*/
public static int getDefaultSize(int size, int measureSpec) {
int result = size; //设置默认大小
int specMode = MeasureSpec.getMode(measureSpec);
int specSize = MeasureSpec.getSize(measureSpec);

switch (specMode) {
case MeasureSpec.UNSPECIFIED:
result = size;
break;
//模式为AT_MOST或EXACTLY时,view测量后的宽/高值 = measureSpec中的size
case MeasureSpec.AT_MOST:
case MeasureSpec.EXACTLY:
result = specSize;
break;
}
return result;
}

可以发现,上面这个方法的逻辑也很简单,首先根据当前View的宽/高规格来得到测量模式和测量大小,然后根据测量模式来计算View的宽/高。正常情况下,我们只需要关注AT_MOST或EXACTLY两种情况就行,在代码中可以看到,这两个情况下View的测量大小都是measureSpec中的SpecSize。所以最终View的测量宽/高也会由SpecSize决定,这个时候我们回顾下上面提到的子View的MeasureSpec计算,当View布局中使用的是wrap_content,那么specMode就会是AT_MOST模式,在这种模式下的View的specSize是parentSize,也就是View的大小是父容器当前剩余的大小,意思就是在这个情况下当View设置为wrap_content相当于使用match_parent。what?这时候你肯定一脸懵逼,那这个wrap_content有什么用?

其实解决方法也是很简单的。在继承View的自定义控件时,重写onMeasure方法并在wrap_content情况下设置默认的内部宽/高即可,对于非wrap_content情况,则按照系统测量值即可。这时候你可能会有疑问:我们平时使用控件的时候,怎么可以设置wrap_content来达到自适应的要求呢?这是因为我们平时使用的控件,如TextView等,从它们的源码可以发现都是针对wrap_content情形,在它们的onMeasure方法做了特殊处理。

从我们也可以得出结论:直接继承View的自定义控件需要重写onMeasure方法并设置wrap_content时自身的大小,否则在布局中使用wrap_content就相当于match_parent。

至于在View中的onMeasure方法中的getSuggestedMinimumWidth和getSuggestedMinimumHeight方法我们就不深究其实现了,其实这两个方法都是在测量模式下为UNSPECIFIED的默认大小,一般用于系统内部的测量过程。至此,单一VIew的measure过程已经完成,其流程图如下:

2. ViewGroup的measure过程

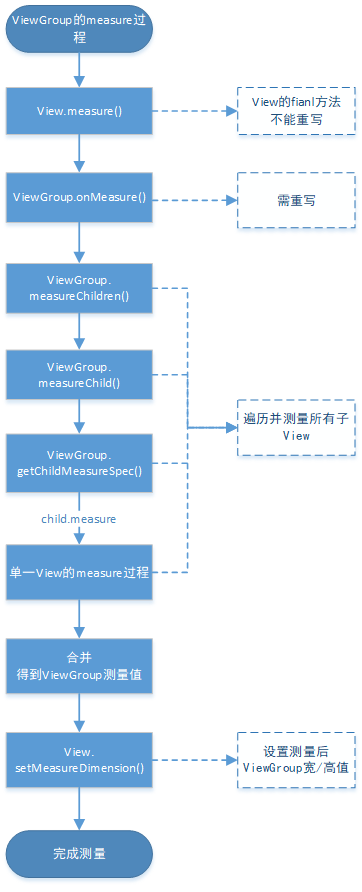
对于ViewGroup来说,measure过程分为两步走:一是遍历测量所有子View的尺寸,而是合并所有子VIew的尺寸,最终得到ViewGroup的测量值。其最开始也是从measure方法开始的:

1
2
3
4
5
6
7
8
9
10
11
12
public final void measure(int widthMeasureSpec, int heightMeasureSpec) {
......
int cacheIndex = forceLayout ? -1 : mMeasureCache.indexOfKey(key);
if (cacheIndex < 0 || sIgnoreMeasureCache) {
// measure ourselves, this should set the measured dimension flag back
onMeasure(widthMeasureSpec, heightMeasureSpec);
mPrivateFlags3 &= ~PFLAG3_MEASURE_NEEDED_BEFORE_LAYOUT;
} else {
.....
}

}

细心的你肯定会发现这方法怎么似曾相识。没错,这与上面单一View measure过程中讲的measure()方法是一致,就是ViewGroup父类View中的measure方法。阅读源码时你会发现在ViewGroup根本找不到这个方法,其实找不到就对了,这是因为在上面我们提到过View中的measure是final方法,所以不能重写该方法。但是ViewGroup的measure过程的入口也是从这个方法开始的。

在measure中我们看到了熟悉的onMeasure方法,想必你又会开始在ViewGroup中寻找onMeasure方法,那么很遗憾的告诉你,在ViewGroup中也没有onMeasure()方法。what? 这是因为不同的ViewGroup子类(LinearLayout、RelativeLayout 、自定义ViewGroup子类等)具备不同的布局特性,这导致他们子View的测量方法各有不同,所以在ViewGroup中并没有像单一View中measure过程那样对onMeasure()做统一的实现。这也是单一View的measure过程与ViewGroup的measure过程最大的不同。

所以在自定义ViewGroup中,关键性的步骤就是:需要根据需求来重写onMeasure()从而实现子View的测量逻辑,而一般重写onMeasure分为三部曲,如下所示:

1
2
3
4
5
6
7
8
9
10
11
12
13
14
15
16
@Override
protected void onMeasure(int widthMeasureSpec, int heightMeasureSpec) {

// 定义存放测量后的View宽/高的变量
int widthMeasure ;
int heightMeasure ;

// 1. 遍历并测量所有子View
measureChildren(widthMeasureSpec, heightMeasureSpec);

// 2. 合并所有子View的尺寸大小,最终得到ViewGroup的测量值
//...根据具体需求实现

// 3. 设置测量后ViewGroup宽/高值
setMeasuredDimension(widthMeasure, heightMeasure);
}

从上面的代码中可以发现,第一步和第三步都是直接调用系统方法,只有第二步需要根据具体需求来合并所有子View的尺寸大小。

现在让我们来看看第一步方法具体是实现的:

1
2
3
4
5
6
7
8
9
10
11
12
13
14
15
16
17
18
19
20
21
22
23
24
25
26
27
28
29
30
31
32
33
34
35
36
  /**
* 遍历所有子View,并调用measureChild进行下一步测量
*
* @param 该ViewGroup宽度的测量规格
* @param 该ViweGroup高度的测量规格
*/
protected void measureChildren(int widthMeasureSpec, int heightMeasureSpec) {
final int size = mChildrenCount;
final View[] children = mChildren;
//遍历所有子View
for (int i = 0; i < size; ++i) {
final View child = children[i];
if ((child.mViewFlags & VISIBILITY_MASK) != GONE) {
measureChild(child, widthMeasureSpec, heightMeasureSpec);
}
}
}

/**
* 计算每个子View的MeasureSpec,并测量每个子View最后的宽/高:调用子View的measure方法
*
* @param child The child to measure
* @param parentWidthMeasureSpec The width requirements for this view
* @param parentHeightMeasureSpec The height requirements for this view
*/
protected void measureChild(View child, int parentWidthMeasureSpec,
int parentHeightMeasureSpec) {
final LayoutParams lp = child.getLayoutParams();

final int childWidthMeasureSpec = getChildMeasureSpec(parentWidthMeasureSpec,
mPaddingLeft + mPaddingRight, lp.width);
final int childHeightMeasureSpec = getChildMeasureSpec(parentHeightMeasureSpec,
mPaddingTop + mPaddingBottom, lp.height);

child.measure(childWidthMeasureSpec, childHeightMeasureSpec);
}

从上面代码可以在measureChildren中,ViewGroup在measure时,会对每一个子View进行measure,然后调用measureChild这个方法,这个方法也很容易理解,首先取出子View的LayoutParams,然后根据子View的LayoutParams和父容器的measureSpec通过getChildMeasureSpec计算出子View的measureSpec,至于getChildMeasureSpec的工作流程我们在上面对View的MeasureSpec的计算已经进行了详细分析,这里就不在进行分析。当计算出子View的measureSpec后就传递给View的measure方法来进行测量,测量过程就是上面分析的单一View的measure过程。遍历并测量所有子View后第一步就完成了。

然后进行第二步操作:合并所有子View的尺寸大小,最终得到ViewGroup的测量值,这里的源码分析需要根据具体的ViewGroup子类才能进行分析(下文会分析)。当得到ViewGroup的测量值后就可以调用setMeasuredDimension设置测量后ViewGroup宽/高值。至此三部曲结束,ViewGroup的measure过程也完成了,其流程图如下:

1564457138321

measure完成后,通过getMeasureWidth或getMeasureHeiht方法可以获取到View的测量宽/高。但是在某些情况下需要多次measure才能确定最终测量宽高,此时measure过程得到的宽高是不准确的,所以更好的做法是:在Layout方法中获取最终的宽高

2.2 layout过程

layout过程跟measure过程类型,也可以根据View的类型分为两种情况:

  • 单一View:仅计算本身View的位置
  • ViewGroup: 除了计算自身View的位置外,还需要确定子View在父容器的位置

同样的我们从单一View的layout过程开始分析:

1. 单一View的layout过程

单一View的layout过程是从layout方法开始的,我们来看看View中的layout方法:

源码:View#layout

1
2
3
4
5
6
7
8
9
10
11
12
13
14
15
16
17
18
19
20
21
   //设置View本身四个顶点的位置
@SuppressWarnings({"unchecked"})
public void layout(int l, int t, int r, int b) {
...
//当前视图的四个顶点
int oldL = mLeft;
int oldT = mTop;
int oldB = mBottom;
int oldR = mRight;

//确定View的位置:初始化四个顶点的值,判断当前View大小和位置是否发生了变化
boolean changed = isLayoutModeOptical(mParent) ?
setOpticalFrame(l, t, r, b) : setFrame(l, t, r, b);

//如果视图大小和位置发生了变化
if (changed || (mPrivateFlags & PFLAG_LAYOUT_REQUIRED) == PFLAG_LAYOUT_REQUIRED) {
//对于单一View的layout过程:由于单一View没有子View,故onLayout是一个空实现
onLayout(changed, l, t, r, b);
....
}
}

从上面我们可以发现在layout中通过setOpticalFrame和setFrame两个方法来确定View的位置。而从源码中我们可以知道setOpticalFrame内部其实是调用了setFrame方法。

1
2
3
4
5
6
7
8
9
10
11
12
13
14
15
16
17
18
19
20
21
22
23
24
25
26
27
//最终确定View本身的位置
private boolean setOpticalFrame(int left, int top, int right, int bottom) {
Insets parentInsets = mParent instanceof View ?
((View) mParent).getOpticalInsets() : Insets.NONE;
Insets childInsets = getOpticalInsets();
return setFrame(
left + parentInsets.left - childInsets.left,
top + parentInsets.top - childInsets.top,
right + parentInsets.left + childInsets.right,
bottom + parentInsets.top + childInsets.bottom);
}
//根据传入的4个位置值,设置View本身的四个顶点位置
@UnsupportedAppUsage
protected boolean setFrame(int left, int top, int right, int bottom) {
boolean changed = false;
......
if (mLeft != left || mRight != right || mTop != top || mBottom != bottom) {
......
mLeft = left;
mTop = top;
mRight = right;
mBottom = bottom;
mRenderNode.setLeftTopRightBottom(mLeft, mTop, mRight, mBottom);
......
}
return changed;
}

在setFrame方法中会对mLeft,mTop,mRight,mBottom进行初始化,然后确定View的位置。让我们回顾下单一View的layout任务,仅计算本身View的位置,这样岂不是任务已经完成了?

没错,既然计算出本身View的位置,按理说单一View就需要再干其它事情了,但是从源码中你会发现在layout方法中,当计算出View的位置后,还是会继续执行onlayout方法。既然已经任务完成,那就什么也不干!没错View就是这么做的,在源码中可以发现onlayout方法其实就是一个空实现而已。如下所示:

1
2
3
//由于在layout中已经对自身View进行了位置计算,所以该方法为空实现
protected void onLayout(boolean changed, int left, int top, int right, int bottom) {
}

到此,单一View的layout过程已经分析完了,其流程如下所示:

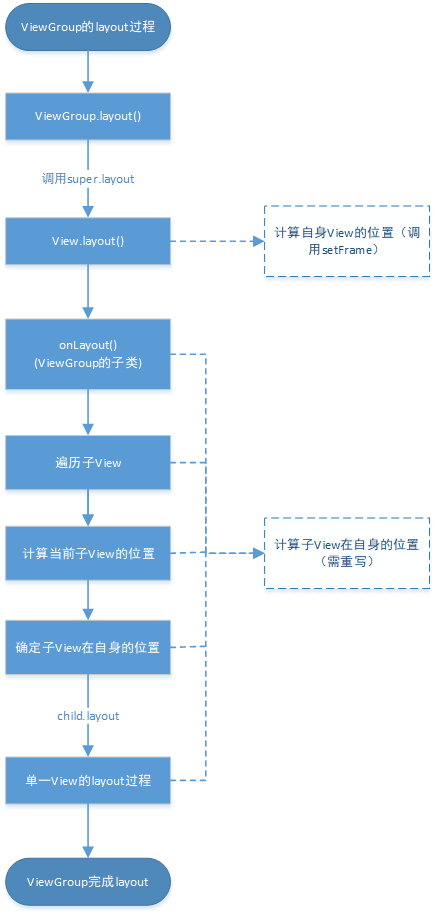
2. ViewGroup的layout过程

ViewGroup的layout过程从其任务来讲可以分成两部分:

  1. 计算自身ViewGroup的位置
  2. 遍历子View,确定自身子View在ViewGroup的位置

所以我们一步一步来分析,首先是计算自身ViewGroup的位置。从上面单一View的layout过程,我们应该可想而知,计算自身ViewGroup的位置,也应该是从layout方法开始的:

源码:ViewGroup#layout

1
2
3
4
5
6
7
8
9
10
11
12
@Override
public final void layout(int l, int t, int r, int b) {
if (!mSuppressLayout && (mTransition == null || !mTransition.isChangingLayout())) {
if (mTransition != null) {
mTransition.layoutChange(this);
}
super.layout(l, t, r, b);
} else {
// record the fact that we noop'd it; request layout when transition finishes
mLayoutCalledWhileSuppressed = true;
}
}

从上面可以发现,ViewGroup的layout是final方法,所以表示子类不能重写该方法,然后里面会调用super.layout,即调用父类View的layout方法。

源码:View#layout

1
2
3
4
5
6
7
8
9
10
11
12
13
14
15
16
17
18
19
20
21
   //设置View本身四个顶点的位置
@SuppressWarnings({"unchecked"})
public void layout(int l, int t, int r, int b) {
...
//当前视图的四个顶点
int oldL = mLeft;
int oldT = mTop;
int oldB = mBottom;
int oldR = mRight;

//确定View的位置:初始化四个顶点的值,判断当前View大小和位置是否发生了变化
boolean changed = isLayoutModeOptical(mParent) ?
setOpticalFrame(l, t, r, b) : setFrame(l, t, r, b);

//如果视图大小和位置发生了变化
if (changed || (mPrivateFlags & PFLAG_LAYOUT_REQUIRED) == PFLAG_LAYOUT_REQUIRED) {
// 对于ViewGroup的layout过程:由于确定位置与具体布局有关,所以onLayout在ViewGroup为抽象方法
onLayout(changed, l, t, r, b);
....
}
}

在上面我们已经分析过了View的layout方法了,这里就不再展开继续讲了。当通过setFrame方法确定ViewGroup自身的位置时,ViewGroup的layout过程已经完成第一部分的任务了。于是开始第二部分遍历子View,确定自身子View在ViewGroup的位置的任务。这个任务通过谁来完成呢?

聪明的你一定想到了!没错就是onLayout方法,在单一View的过程中在计算出自身的位置后任务就完成了,所以在View中onLayout方法为空实现,而在ViewGroup中由于还需要计算出子View在自身的位置,所以并不是空实现,如下:

1
2
3
  // 对于ViewGroup的layout过程:由于确定位置与具体布局有关,所以onLayout在ViewGroup为抽象方法
@Override
protected abstract void onLayout(boolean changed, int l, int t, int r, int b);

这时候估计你又有疑问了,what?实现在哪?其实这和ViewGroup的onMeasure方法类型,onLayout确定子View的位置与具体布局有关,所以在ViewGroup中onLayout方法只是一个抽象方法。

既然是个抽象方法,那就意味着在自定义ViewGroup时必须要重写onLayout方法,而重写的任务总的来说可以分为三部分:

  1. 遍历子View
  2. 计算当前子View的四个位置值
  3. 确定子View在父容器的位置

示例代码如下:

1
2
3
4
5
6
7
8
9
10
11
12
13
14
15
16
17
18
19
20
protected void onLayout(boolean changed, int left, int top, int right, int bottom) {
// 1. 遍历子View:循环所有子View
for (int i=0; i<getChildCount(); i++) {
View child = getChildAt(i);

// 2. 计算当前子View的四个位置值
// 2.1 位置的计算逻辑
...// 需自己实现,也是自定义View的关键

// 2.2 对计算后的位置值进行赋值
int mLeft = Left
int mTop = Top
int mRight = Right
int mBottom = Bottom

// 3. 确定子View在父容器的位置
child.layout(mLeft, mTop, mRight, mBottom);
}
}
}

而child.layout其实就是调用View的layout方法 ,就是单个View的layout过程。单有示例代码估计还很能使你信服,就让我们来瞧瞧LinearLayout是如何来重写onLayout方法的。

1
2
3
4
5
6
7
8
9
@Override
protected void onLayout(boolean changed, int l, int t, int r, int b) {
//根据自身方向属性,选择不同处理方法
if (mOrientation == VERTICAL) {
layoutVertical(l, t, r, b);
} else {
layoutHorizontal(l, t, r, b);
}
}

用过LinearLayout自然知道我们是可以设置布局是水平还是垂直,所以在onLayout方法对这两个布局做了分别处理,在这里我们选择layoutVertical来追踪其实现。

源码:LinearLayout#layoutVertical&setChildFrame

1
2
3
4
5
6
7
8
9
10
11
12
13
14
15
16
17
18
19
20
21
22
23
24
25
26
27
28
29
30
31
32
33
34
35
36
37
38
39
40
41
42
43
44
45
46
47
48
49
50
51
52
53
54
55
56
57
58
59
60
  void layoutVertical(int left, int top, int right, int bottom) {
...
//子View的数量
final int count = getVirtualChildCount();
......
//1.遍历子View
for (int i = 0; i < count; i++) {
final View child = getVirtualChildAt(i);
if (child == null) {
childTop += measureNullChild(i);
} else if (child.getVisibility() != GONE) {
//2.计算子View的测量宽/高,计算当前子View的四个位置值
final int childWidth = child.getMeasuredWidth();
final int childHeight = child.getMeasuredHeight();

final LinearLayout.LayoutParams lp =
(LinearLayout.LayoutParams) child.getLayoutParams();

int gravity = lp.gravity;
if (gravity < 0) {
gravity = minorGravity;
}
final int layoutDirection = getLayoutDirection();
final int absoluteGravity = Gravity.getAbsoluteGravity(gravity, layoutDirection);
switch (absoluteGravity & Gravity.HORIZONTAL_GRAVITY_MASK) {
case Gravity.CENTER_HORIZONTAL:
childLeft = paddingLeft + ((childSpace - childWidth) / 2)
+ lp.leftMargin - lp.rightMargin;
break;

case Gravity.RIGHT:
childLeft = childRight - childWidth - lp.rightMargin;
break;

case Gravity.LEFT:
default:
childLeft = paddingLeft + lp.leftMargin;
break;
}

if (hasDividerBeforeChildAt(i)) {
childTop += mDividerHeight;
}

childTop += lp.topMargin;
//3.确定子View在父容器的位置
setChildFrame(child, childLeft, childTop + getLocationOffset(child),
childWidth, childHeight);
// childTop逐渐增大,即后面的子元素会被放置在靠下的位置
// 这符合垂直方向的LinearLayout的特性
childTop += childHeight + lp.bottomMargin + getNextLocationOffset(child);

i += getChildrenSkipCount(child, i);
}
}
}
private void setChildFrame(View child, int left, int top, int width, int height) {
//调用子View的layout
child.layout(left, top, left + width, top + height);
}

而setChildFrame其实就是调用了子View的layout,然后在子view的layout中会通过setFrame去设置子元素四个顶点的位置,这样一来子元素在父元素的位置就确定了。其实现总体上来说是跟上面讲到的任务三步骤是一致的。这么一来ViewGroup的layout过程大功告成,其流程如下所示:

1564456349719

2.3 draw过程

前面我们分析了View三大流程的measure,,layout过程,最后当然要显示出来,故draw过程作用就在于此,将View绘制到屏幕上来,与前面两个过程一致,draw过程也分为两大类型:

  • 单一View:仅绘制View本身
  • ViewGroup:除了绘制自身View外,还需绘制所有子View

两大类型的View绘制过程都可以归纳为如下几步:

  1. 绘制背景
  2. 绘制自己
  3. 绘制子View
  4. 绘制装饰

然后我们还是根据老规则,从单一View的draw过程开始分析。
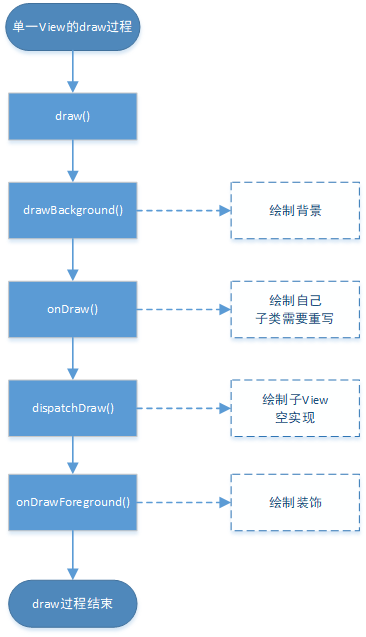
1. 单一View的draw过程

单一View的draw过程也是从draw方法入口进入的,如下:

源码:ViewGroup#draw

1
2
3
4
5
6
7
8
9
10
11
12
13
14
15
16
17
18
19
20
21
22
23
24
25
26
27
28
29
30
31
32
33
34
35
36
37
38
39
40
41
42
  public void draw(Canvas canvas) {
final int privateFlags = mPrivateFlags;
final boolean dirtyOpaque = (privateFlags & PFLAG_DIRTY_MASK) == PFLAG_DIRTY_OPAQUE &&
(mAttachInfo == null || !mAttachInfo.mIgnoreDirtyState);
mPrivateFlags = (privateFlags & ~PFLAG_DIRTY_MASK) | PFLAG_DRAWN;

/*
* Draw traversal performs several drawing steps which must be executed
* in the appropriate order:
*
* 1. Draw the background(绘制背景)
* 2. If necessary, save the canvas' layers to prepare for fading(保存图层)
* 3. Draw view's content(绘制自己)
* 4. Draw children(绘制子View)
* 5. If necessary, draw the fading edges and restore layers(复原图层)
* 6. Draw decorations (scrollbars for instance) (绘制装饰)
*/
int saveCount;
//1.绘制本身View的背景
if (!dirtyOpaque) {
drawBackground(canvas);
}

//若有必要,则保存图层,当不需绘制Layer时,会跳过“保存图层”和“复原图层”
final int viewFlags = mViewFlags;
boolean horizontalEdges = (viewFlags & FADING_EDGE_HORIZONTAL) != 0;
boolean verticalEdges = (viewFlags & FADING_EDGE_VERTICAL) != 0;
//不保存图层,故跳过保存图层和复原图层步骤
if (!verticalEdges && !horizontalEdges) {
//2.绘制本身View内容,
if (!dirtyOpaque) onDraw(canvas);

//3.绘制子View
dispatchDraw(canvas);

//4.绘制装饰
onDrawForeground(canvas);
......
return;
}
.....
}

上面贴出了单一View的draw()方法中的关键性代码,也可以证明前面提到的draw步骤。然后我们继续分析draw方法中的4个步骤调用的方法:

1
2
3
4
5
6
7
8
9
10
11
12
13
14
15
16
17
18
19
20
21
22
23
24
25
26
27
28
29
30
31
32
33
34
35
36
37
38
39
40
41
42
43
44
45
46
47
48
49
50
51
52
53
54
55
56
57
58
59
60
61
62
63
64
65
66
67
68
69
70
71
72
73
74
75
76
77
78
79
80
81
82
83
84
85
86
87
88
89
  /**
* 1.绘制View本身的背景
* @param canvas Canvas on which to draw the background
*/
@UnsupportedAppUsage
private void drawBackground(Canvas canvas) {
final Drawable background = mBackground;
if (background == null) {
return;
}
//根据layout过程中获取的View的位置参数,来设置背景的边界
setBackgroundBounds();


// Attempt to use a display list if requested.
if (canvas.isHardwareAccelerated() && mAttachInfo != null
&& mAttachInfo.mThreadedRenderer != null) {
mBackgroundRenderNode = getDrawableRenderNode(background, mBackgroundRenderNode);

final RenderNode renderNode = mBackgroundRenderNode;
if (renderNode != null && renderNode.isValid()) {
setBackgroundRenderNodeProperties(renderNode);
((DisplayListCanvas) canvas).drawRenderNode(renderNode);
return;
}
}

final int scrollX = mScrollX;
final int scrollY = mScrollY;
if ((scrollX | scrollY) == 0) {
background.draw(canvas);
} else {
//若mScrollX和mScrollY有值,则对Canva的坐标进行偏移
canvas.translate(scrollX, scrollY);
//调用drawable的draw方法绘制背景
background.draw(canvas);
canvas.translate(-scrollX, -scrollY);
}
}

/**
* 2.绘制本身View内容,
* 由于View的内容各不相同,所以该方法为空实现
* 在自定义View绘制过程中,需要由子类重写该方法,从而绘制自身的内容
* 自定义View中必须且只需重写onDraw
*
* @param canvas the canvas on which the background will be drawn
*/
protected void onDraw(Canvas canvas) {
}

/**
* 3.绘制子View,单一View中无子View,所以为空实现
* @param canvas the canvas on which to draw the view
*/
protected void dispatchDraw(Canvas canvas) {
}

/**
* 4.绘制装饰,如滚动指示器、滚动条和前景
* @param canvas canvas to draw into
*/
public void onDrawForeground(Canvas canvas) {
onDrawScrollIndicators(canvas);
onDrawScrollBars(canvas);

final Drawable foreground = mForegroundInfo != null ? mForegroundInfo.mDrawable : null;
if (foreground != null) {
if (mForegroundInfo.mBoundsChanged) {
mForegroundInfo.mBoundsChanged = false;
final Rect selfBounds = mForegroundInfo.mSelfBounds;
final Rect overlayBounds = mForegroundInfo.mOverlayBounds;

if (mForegroundInfo.mInsidePadding) {
selfBounds.set(0, 0, getWidth(), getHeight());
} else {
selfBounds.set(getPaddingLeft(), getPaddingTop(),
getWidth() - getPaddingRight(), getHeight() - getPaddingBottom());
}

final int ld = getLayoutDirection();
Gravity.apply(mForegroundInfo.mGravity, foreground.getIntrinsicWidth(),
foreground.getIntrinsicHeight(), selfBounds, overlayBounds, ld);
foreground.setBounds(overlayBounds);
}

foreground.draw(canvas);
}
}

结合注释和代码应该不难理解上面4个方法,不过需注意的两点:一是onDraw方法,由于每个View的内容各不相同,所以该方法为空实现,当自定义View时,必须重写而且一般来说只需要重写这个方法就行了。二是dispatchDraw方法,我们知道这个方法是用来绘制子View的,但是单一View是没有子View的,所以该方法自然而然为空实现。至此,单一View的draw过程就分析完毕了,其流程如下:
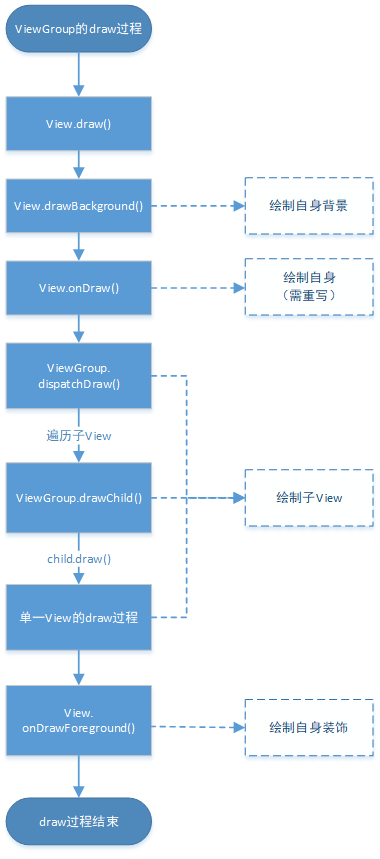
1564413442881

2. ViewGroup的draw过程

ViewGroup的draw过程也是从draw开始的,当时ViewGroup中并没有重写父类View的draw()方法,因此ViewGroup的draw过程的入口是View的draw()方法,源码与上面子View的draw过程贴出来的draw方法是一样的,所以这里就不再贴出来了,然后ViewGroup都没有重写drawBackground,onDraw,onDrawForeground方法,所以这些方法都是与单一View的draw过程是一致的,这里不再过多描述。

ViewGroup和View的draw过程最大的不同就是绘制子View的dispatchDraw方法,让我们来瞧瞧ViewGroup中是如何来绘制子View的:

源码:ViewGroup#dispatchDraw

1
2
3
4
5
6
7
8
9
10
11
12
13
14
15
16
17
18
19
20
21
  //遍历并绘制子View,一般不需要重写该方法
@Override
protected void dispatchDraw(Canvas canvas) {
.....
//得到子View数目
final int childrenCount = mChildrenCount;
....
//1.遍历子View
for (int i = 0; i < childrenCount; i++) {
while (transientIndex >= 0 && mTransientIndices.get(transientIndex) == i) {
final View transientChild = mTransientViews.get(transientIndex);
if ((transientChild.mViewFlags & VISIBILITY_MASK) == VISIBLE ||
transientChild.getAnimation() != null) {
//2.绘制子View视图
more |= drawChild(canvas, transientChild, drawingTime);
}
....
}
}
....
}

dispatchDraw方法代码很多,在这里只贴出关键代码,可以看到绘制子view与measure,layout过程相似,首先遍历子View,然后进行子视图的绘制。而drawChild就是简单调用子View的draw方法。然后就是单一View的draw过程。

1
2
3
4
//绘制子View
protected boolean drawChild(Canvas canvas, View child, long drawingTime) {
return child.draw(canvas, this, drawingTime);
}

至此ViewGroup的draw过程分析完毕。其流程如下:

1564455914688

到这里我们就把View的三大流程:measure,layout,draw都分析完啦!最后贴上总的工作流程图:

1564464826825

-------------本文结束感谢您的阅读-------------